A MultiTracks download, or a plain folder of stems, in. A finished, stage-ready Live 12 song out.
Quick start, four steps
Install. Open the DMG and drag BuildAble 12 to Applications (Section 02).
Add a folder. Drop a folder of MultiTracks downloads onto the window, or use
Choose Folder… (Section 05). No download? Create New Song… from a folder of stems (Section 06).
Convert a song. Adjust anything you want on its card, then press its
Convert button (Section 09). The first five are free.
Open it in Live 12. The finished project lands in your output folder, click,
guide, sections, and routing already wired (Section 24).
Everything below is the long version. New in 1.1: the
Song Library (Section 25), custom control lanes (Section 21),
AbleSet Cues mode (Section 15), and in-app updates (Section 26).
Section 01
What BuildAble 12 does
A MultiTracks download is built for compatibility, not for your stage. It's a Live 8
session with the stems, a tempo map, and not much else. Or you might not have a download at all, just a
folder of stems you bounced yourself. Either way in, BuildAble 12 builds a finished Live 12 song, click,
spoken guide cues, sections, lyrics, and routing, laid into your AbleSet template and ready to play.
What goes in
Two kinds of input, and the app treats them as equals:
An unzipped MultiTracks.com download: a folder holding MultiTrack.als
next to a MultiTracks folder of stems. Change nothing about it.
A plain folder of stems, wav, aif, m4a, mp3, and other common audio formats, with
no session at all. You lay the arrangement out yourself (Section 06).
What you can edit, by input
The two inputs build the same finished song. The one real difference is who owns the tempo and meter,
the download brings its own and locks them; on a folder of stems you set everything.
Feature
Folder of stems
MultiTracks download
Tempo map & time signatures
You set them, or import a click (Section 13)
From the file, locked
Sections, section cues, performance cues
Yours
Yours
Count-in
Yours (Section 12)
Not needed, it brings its own start
Track names, returns, lyrics, notes
Same
Same
Guide cue auto-detection
On an imported guide (Section 13)
On the download's guide stem (Section 14)
What comes out
A complete Ableton Live 12 project folder, the session, the stems copied in beside it, the album
art, and your AbleSet data. Open it and play it. There is no "now finish the rest by hand" step.
It comes out in one particular shape, and that is on purpose. The folder name, the
lane names, the way the stems sit next to the session, all of it is a format that AbleSet, StitchAble,
and the Song Library read directly. BuildAble decides those things so that nothing downstream has to
guess, and so the same song still makes sense to the tools a year from now. Section 24 lays out exactly
what's fixed and what each fixed thing buys you.
It doesn't transpose. BuildAble 12 builds the song; it doesn't change its key.
What it does do is tag your drums and loops [noshift], so when you later transpose that
song in StitchAble, the pitched instruments move and your grooves don't.
The two-app pair
BuildAble 12 makes songs. StitchAble stitches them into a setlist. They share one engine and one
sound library, the guide voice and click sounds you set up in one show up in the other, because
they're the same files on disk.
It works in batches
Direct it at a folder of downloads and every song is listed. Adjust the ones that need it, leave the
rest on defaults, and convert the whole Sunday, same lanes, same cues, same outputs, every song.
Section 02
Install, try, activate
Install it and start converting. The first five conversions are free, and nothing is
held back in them.
Before you start
macOS 14.6 or later, Apple Silicon or Intel.
Ableton Live 12 to open the converted sessions. Live 12 is what BuildAble writes,
it's required to open a converted song, though not to run the conversion itself.
AbleSet, recommended. The sessions are built for it, but it isn't required to
convert songs or to open them in Ableton. AbleSet Cues mode (Section 15) is the one feature that
assumes it.
Your MultiTracks.com downloads, unzipped, or a folder of stems.
1 · Install
Open the DMG, drag BuildAble 12 to Applications, and launch it. It's Developer-ID
signed and notarized by Apple, so it opens with a normal double-click.
2 · Convert five songs free
There is no gate on first launch. Convert straight away and you get five full
conversions, real finished Live 12 sessions with nothing watermarked, disabled, or held back.
The header shows Demo · N left so you always know where you stand.
One thing the demo does limit besides the count: the Song Library (Section 25) shows
only the first 10 songs it finds until the app is activated. It still loads the folder,
you just see ten of them, with a banner offering to activate. Activate and the rest appear right away.
3 · Activate when you're ready
Buy a license and you get a key on your receipt. Click Demo · N left in the
header, or just try to convert past the fifth song, then paste the license key and
press Activate for unlimited conversions.
The key is checked online once. After that the app runs offline, permanently.
Each purchase includes 5 activations, enough for the studio Mac, the stage Mac, and the spare.
The conversions you made during the demo stay exactly where they are. Nothing to redo.
Reinstalling, or moving machines? Email the support address on the activation screen.
If the key is rejected, the message tells you which problem it is: a typo, all activations used, a
refunded purchase, or the license server being unreachable. Only the last one is worth retrying.
Section 03
Setup and sounds
BuildAble 12 builds a MIDI click and spoken guide cues, and it comes with the sounds to
build them from. There is nothing to download before your first song.
What ships with it
The click sounds and the spoken guide voices install with the app. Activate it and you can convert a
song straight away, with a click that plays and cues that speak.
Adding your own
Open Settings (the gear, top-right) and press Set Up… to direct it
at a folder of sounds and install it into your Ableton User Library. Use it for the free MultiTracks
Click and Guide Samples pack if you want those exact recordings, or for sounds of your own.
Get the free pack in Settings opens the MultiTracks download page. When it finishes,
Settings shows what is installed and the button becomes Re-run Setup….
Why you might still want the MultiTracks pack. MultiTracks reuses the same cue
recordings across their songs, so having those exact files in your library makes the audio fingerprint
match on a download about as close to exact as it gets. It is optional, and it is free.
Guide families
A family is a voice: English, Spanish, French, Portuguese, or one you build
yourself. Cues resolve strictly inside the chosen family, so a Spanish set can never pull an
English word.
Built-in cues live in the family's MAIN folder.
Your own recordings go to _Imported, import one and it's available everywhere.
Import Family… takes a folder or a zip, and works out who the voice came
from rather than making you say. The family manager creates, adds to, and replaces families.
Families can sit in collections, shown as nested submenus that are built from the
names you give them, so a long list stays readable. Import files a voice away for you, and you can
organize your own.
The sound library is shared with StitchAble. Set the voice and the click sounds up
in either app and both use them. One install, two apps.
Section 04
The main window
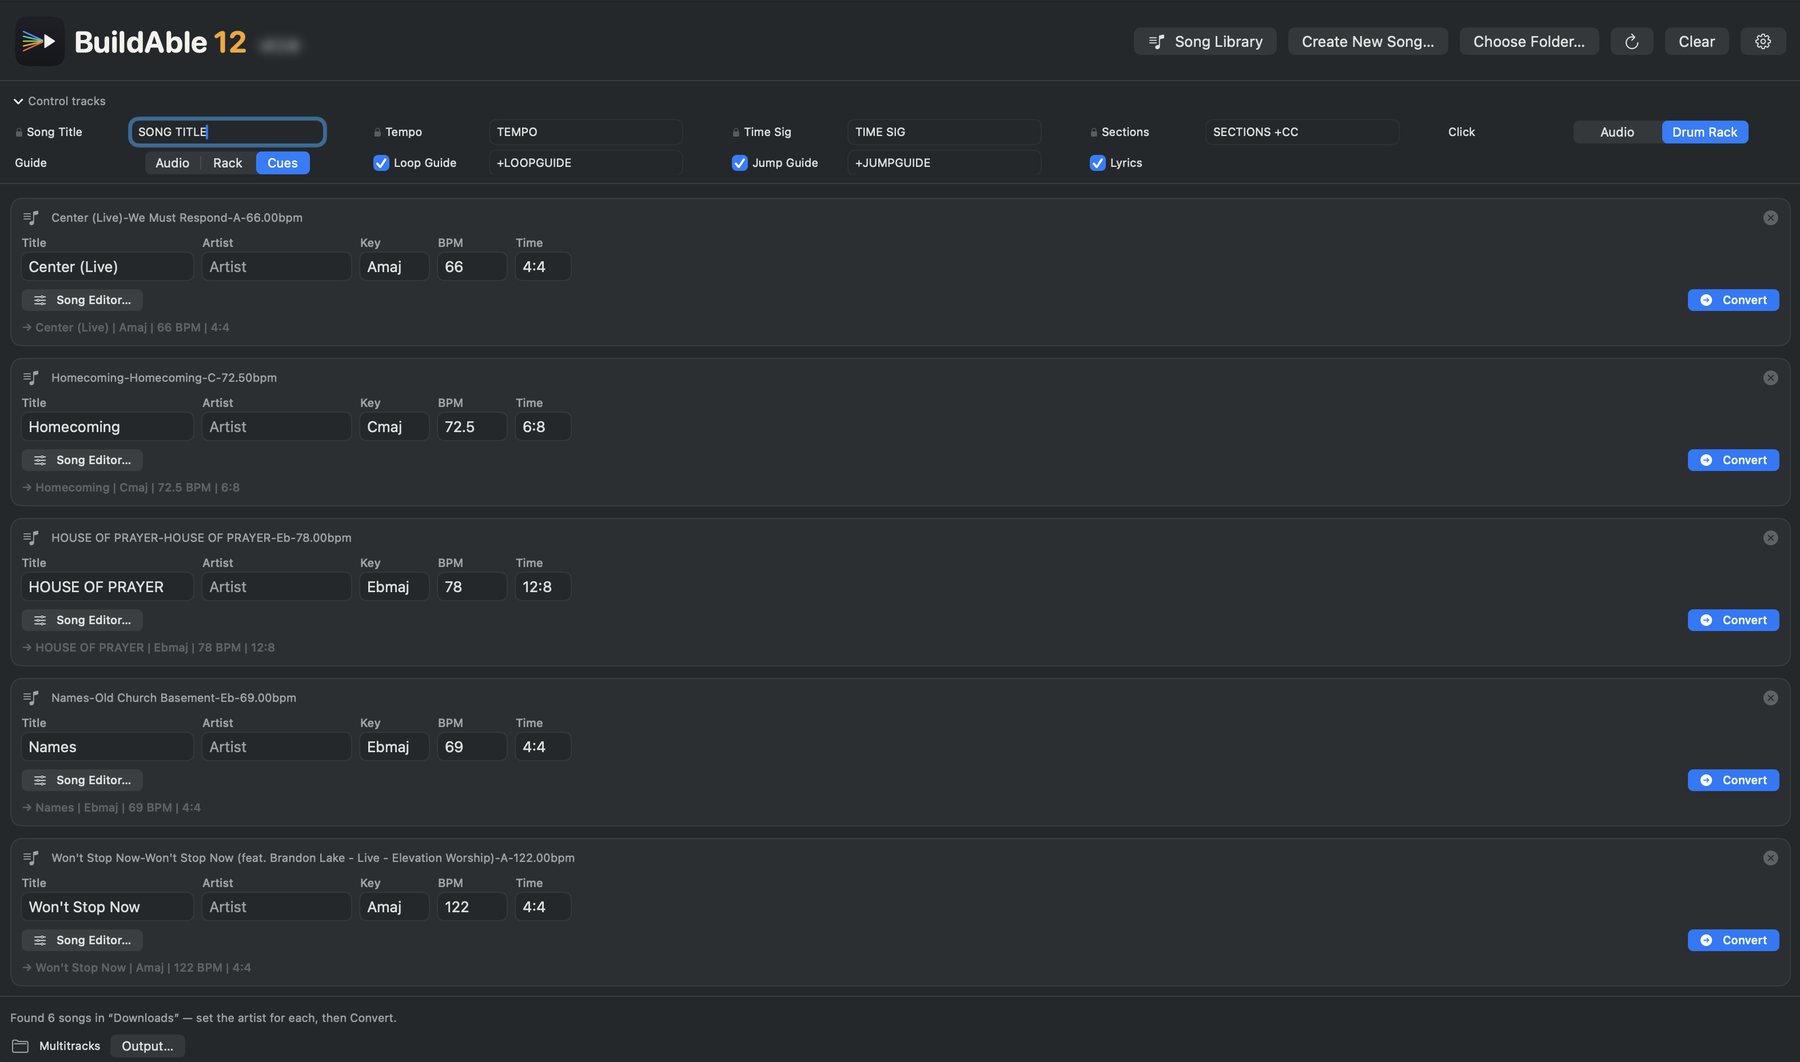
One window does the whole job: choose a folder, glance down the list, press Convert on
the songs you want.
Control tracks up top · a card per song · your output folder along the bottom
Header
Choose Folder…, where your downloads are. BuildAble remembers this
folder, so next launch it reopens and re-scans it and your list is where you left it. Songs
you already converted come back flagged, in their own Already converted group, read
from their song cards. Choose Folder… opens at your last location rather than at the top of your
drive.
↻ Refresh, re-scans the folders you've already used and adds anything new.
Clear, empties the list.
Gear, Settings (Section 22).
Control tracks
The collapsible strip at the top decides what each built lane is called, and which of the few
optional lanes you want. The structural lanes are always built, you can't turn them off (Section 08).
Set it once, it persists.
The song list
One card per detected song. Fill in what you want, open the Song Editor for the songs that need it,
ignore the rest. Each card has its own Convert button, so you build a song when it's
ready rather than all at once (Section 09).
Footer
Status line, what was found, what's converting, what happened.
Output…, where converted songs get written, with the current folder shown
beside it.
Closing the last window quits the app. No lingering icon in the Dock or the menu
bar wondering whether it is still running.
Section 05
Adding songs
Direct BuildAble 12 at a folder. It finds the downloads inside and ignores everything
else.
What counts as a download
A folder containing MultiTrack.als sitting directly beside a MultiTracks
folder of stems. That exact signature is how the app locks onto real downloads and leaves your other
projects alone.
Build My Life-Worthy of Your Name-G-70.00bpmthe download└ MultiTrack.alsa Live 8 session└ MultiTracks/the stems
Adding them
Choose Folder…, or drag a folder onto the list.
If the folder is a download, it's added. If it isn't, the app looks one level
down and adds every download it finds. It doesn't burrow deeper, and it skips hidden
folders.
Every folder you use is remembered. ↻ Refresh re-scans them and adds only what's
new, download three more songs on Saturday, hit refresh, and there they are.
Zips are fine, rearranging isn't. Drop a .zip straight on the window
and BuildAble unzips it for you. What it can't do is recognize a download whose insides have been
moved around, the signature is the whole detection rule.
Section 06
Create a song from stems
No MultiTracks session? Fine. Direct BuildAble 12 at a plain folder of audio and it
builds the same finished Live 12 song. The difference is that you lay the arrangement out, instead of
a download doing it for you.
Create New Song… on the main window opens a folder picker. Choose a folder of stems,
wav, aif, m4a, mp3, and other common audio formats, and it lists as a manual song card alongside your downloads. Title, BPM, key, and
meter start from the folder name and your defaults, and every one of them is editable in the Song Editor.
What is different
On a download the tempo map and the meters are baked in and locked, because they came from the file.
On a manual song you own all of it. Tempo, time signatures, sections, count-in, and cues are yours to
set on the Sections timeline (Section 12).
What is the same
Track Names, Returns, Lyrics, and Section Notes behave exactly as they do for a download. The build
reads your audio straight from the folder you chose and lays it into the same AbleSet template.
Nothing about the output is second class.
Have a click or a guide for the song? Then do not set the tempo by hand. Import it
and let it do the work, see Section 13.
Section 07
The song card
Each card is one song, and everything on it is editable before you convert.
What's on it
Status icon, see below.
The source folder name, in gray, so you can tell two versions of a song apart.
Title · Artist · Key · BPM · Time, auto-filled where the download says, blank
where it doesn't. Artist is left for you, because MultiTracks doesn't reliably say.
Song Editor…, everything else about this song (Section 10).
Bottom line, the output folder name this song will get, previewed live as you
type.
Status
Icon
Meaning
♪ gray
Ready. It'll build on the next Convert.
◌ spinner
Working.
✓ green
Done, and it's a button. Click it to re-arm the song so it builds again. Until you do, Convert skips it.
⚠ amber
Failed. The bottom line says why.
The green check is the thing people miss. Converted songs are deliberately skipped
so a re-convert doesn't rebuild your whole Sunday to fix one song. Click the check on the song you
changed, and only that one rebuilds.
Section 08
Control tracks
These are the lanes BuildAble 12 builds. The structural ones are always there, that's
the format. What you control here is what each lane is called, the mode a couple of them build in, and
the handful that are genuinely optional.
Lane
What it builds
Song Title
The title label AbleSet shows for the song. Always built.
Tempo
A clip per tempo segment, plus the master tempo automation. Always built.
Time Sig
A label per meter segment, plus the master meter automation. Always built.
Click
The meter-aware click, accent, quarter, eighth, sixteenth. Always built; you choose Audio or Drum Rack as its mode.
Sections +CC
One label clip per section, colored, plus arrangement locators. Always built.
+GUIDE
The spoken guide lane (Section 14). Always built; you choose Audio, Rack, or Cues as its mode.
+LOOPGUIDE
Re-announces the current section at each boundary, for when you loop it. Optional.
+JUMPGUIDE
Announces a jump when you skip around a set. Optional, and only in AbleSet Cues mode.
Lyrics
A lyrics text lane. Optional. More text lanes, including a Numbers lane, are built from the Lyrics editor (Section 17).
How the panel is laid out
The four locked structural lanes, Song Title, Tempo,
Time Sig, and Sections, sit pinned as a block along the top. Everything
you can actually change about a build, Click, Guide, Loop Guide, Jump Guide, and Lyrics, sits below a
divider. What's fixed and what's yours is a glance, not a read.
The structural lanes aren't optional, and that's deliberate. Tempo, Time Sig,
Click, Sections, and the guide are always built, because a song missing its tempo map or its sections
isn't a finished song. You rename them and set the Click and Guide modes; you don't switch them off.
Your own OSC and MIDI lanes are a separate thing you add on the timeline, see Section 21.
Section 09
Converting
Each song card has its own Convert button. Press it and that song
builds. If you haven't set an output folder, the app asks for one first.
What happens
The song you converted builds. Songs already marked done are skipped, so a second
pass over the list doesn't rebuild everything.
The card goes working → done (with its output name) or failed (with
the reason).
You get a summary line, and Finder opens on the result.
Everything is done first, then written. Convert doesn't touch your downloads. It
reads them and writes new project folders somewhere else, so a failed convert costs you nothing but
the time, run it again.
Rebuilding a song
Changed a cue, fixed a key, re-routed a stem? Click that song's green check to
re-arm it, then press Convert on it again. Only that song rebuilds.
Your work in progress is saved as you go
Setting up a song is real work, and losing it to a crash is the kind of thing that makes you not want
to do it again. So it doesn't get lost. Edits autosave into the song's own folder while you work: when
you change tabs, when you close it, and every five minutes regardless. If that folder is read-only, the
draft goes to Application Support instead.
An Edited badge on the card tells you there's unconverted work in there.
If the app goes down, the work is waiting when you open the song again.
The draft clears itself once the song converts, so it doesn't pile up.
Section 10
The Song Editor
Everything about one song, in one window. Convert on defaults and never open it, or
open it and shape the song exactly.
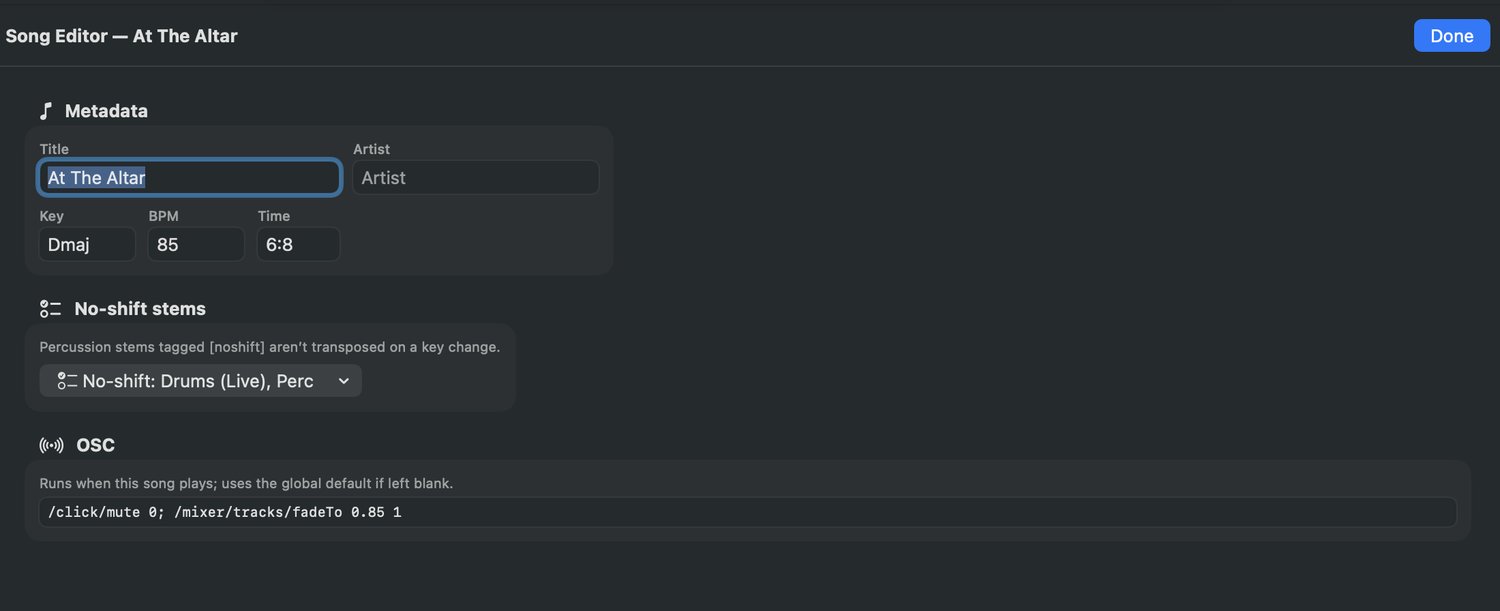
Metadata · no-shift stems · track names
Metadata, title, artist, key, BPM, time signature.
No-shift stems, percussion and loops, tagged [noshift] so a later
key change in StitchAble leaves them alone. They're detected for you; the picker is there for the ones
it can't guess (Section 01).
Track names, rename the imported stems (Section 11).
Lyrics & Chords, the banner editor (Section 17).
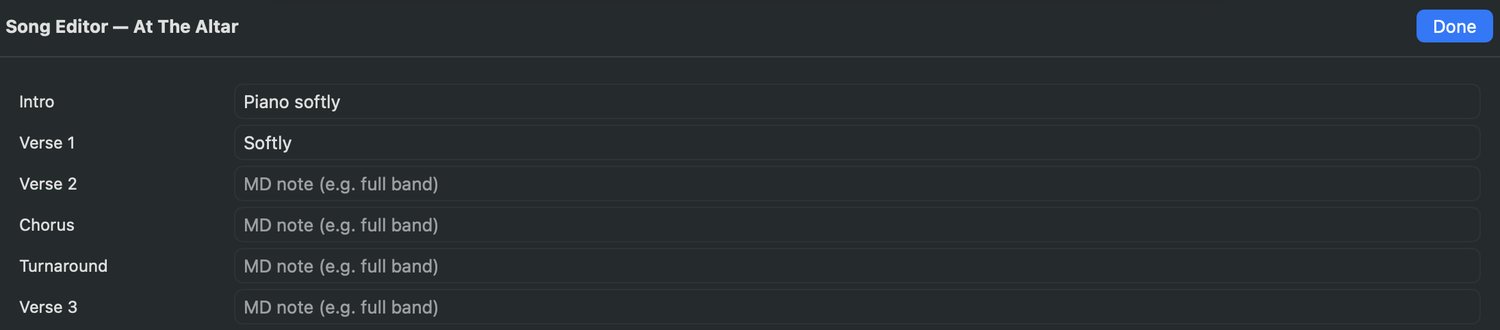
Section Notes, a director's note per section (Section 18).
Everything you set is remembered against that song, so closing the editor and coming back loses
nothing.
The Song tab
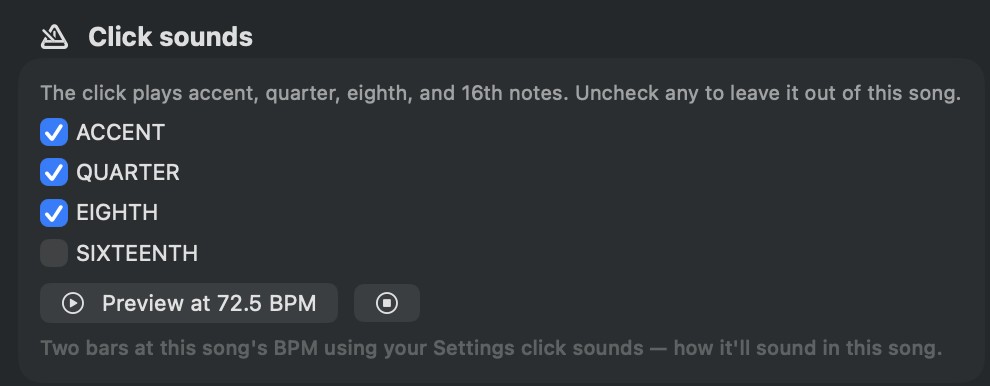
Metadata, the no-shift picker, and a mute per click pad
Two things here are worth knowing. The no-shift stems picker marks the drums and
percussion that must never be transposed on a key change, so only pitched instruments move. And the
sixteenth click pad is muted by default, because most songs do not want sixteenths
ticking away. Tick it when a song needs them.
Section 11
Renaming the tracks
MultiTracks names its stems the way MultiTracks names things. You probably don't call
them that. Rename them once, by rule, and every song you ever convert comes out speaking your language.
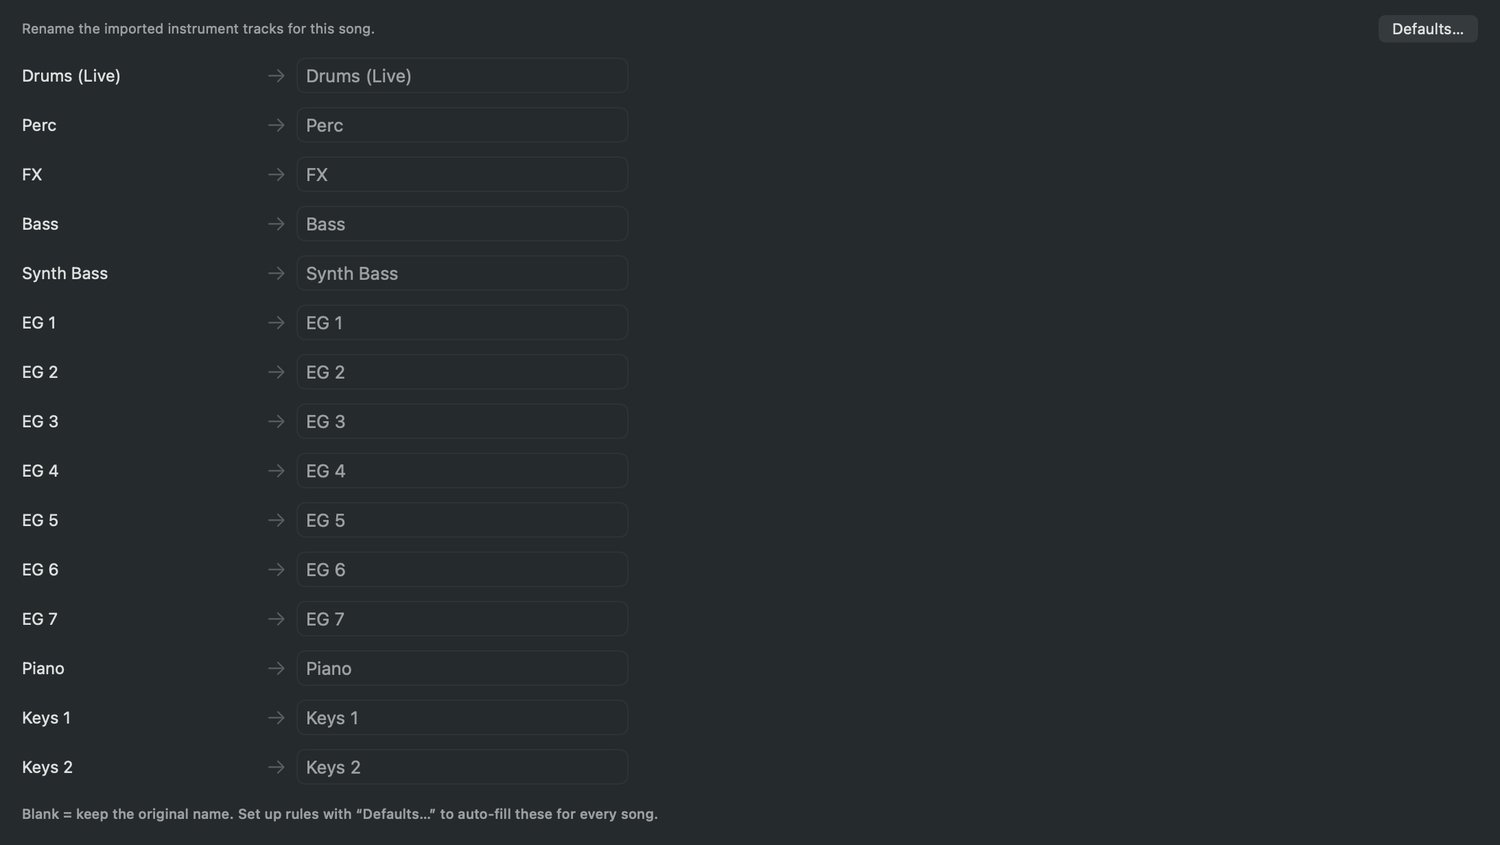
The download's name on the left. Yours on the right. Blank keeps the original.
Per song
In the Song Editor, every imported stem is listed with a field beside it. Type what you want the
track called in Live. Leave it blank and the original name stays, you only fill in the
ones you care about.
By rule, for every song
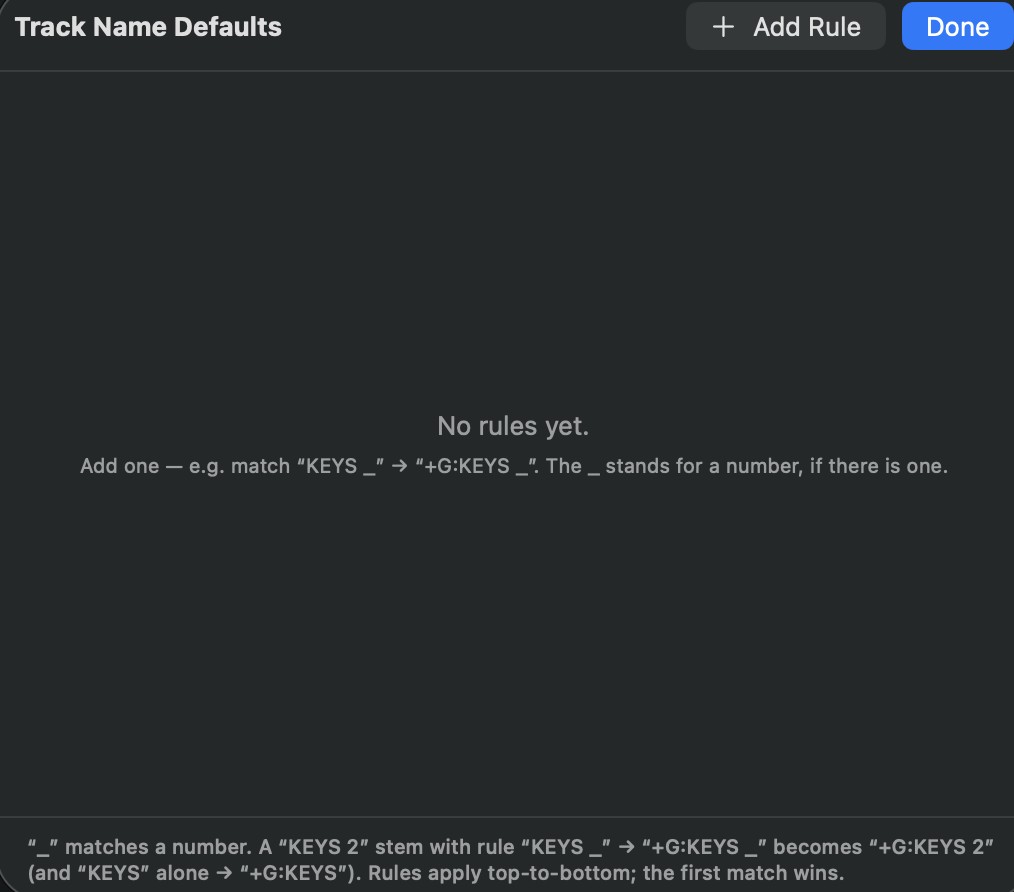
Defaults… is the part that matters. Set up rules there and they auto-fill the names
for every song you convert, so you're not retyping the same twenty stems every Sunday.
This is the same wildcard system the returns use. A rule on EG _
catches EG 1 through EG 7, _ stands for a number. Write the rule once;
it holds for every song, forever.
Names matter more than they look like they do: they're what you read on a dark stage, and they're
what the routing rules match against when they decide which return a stem lands on (Section 19).
Rules run on import, first match wins
Section 12
The Sections timeline
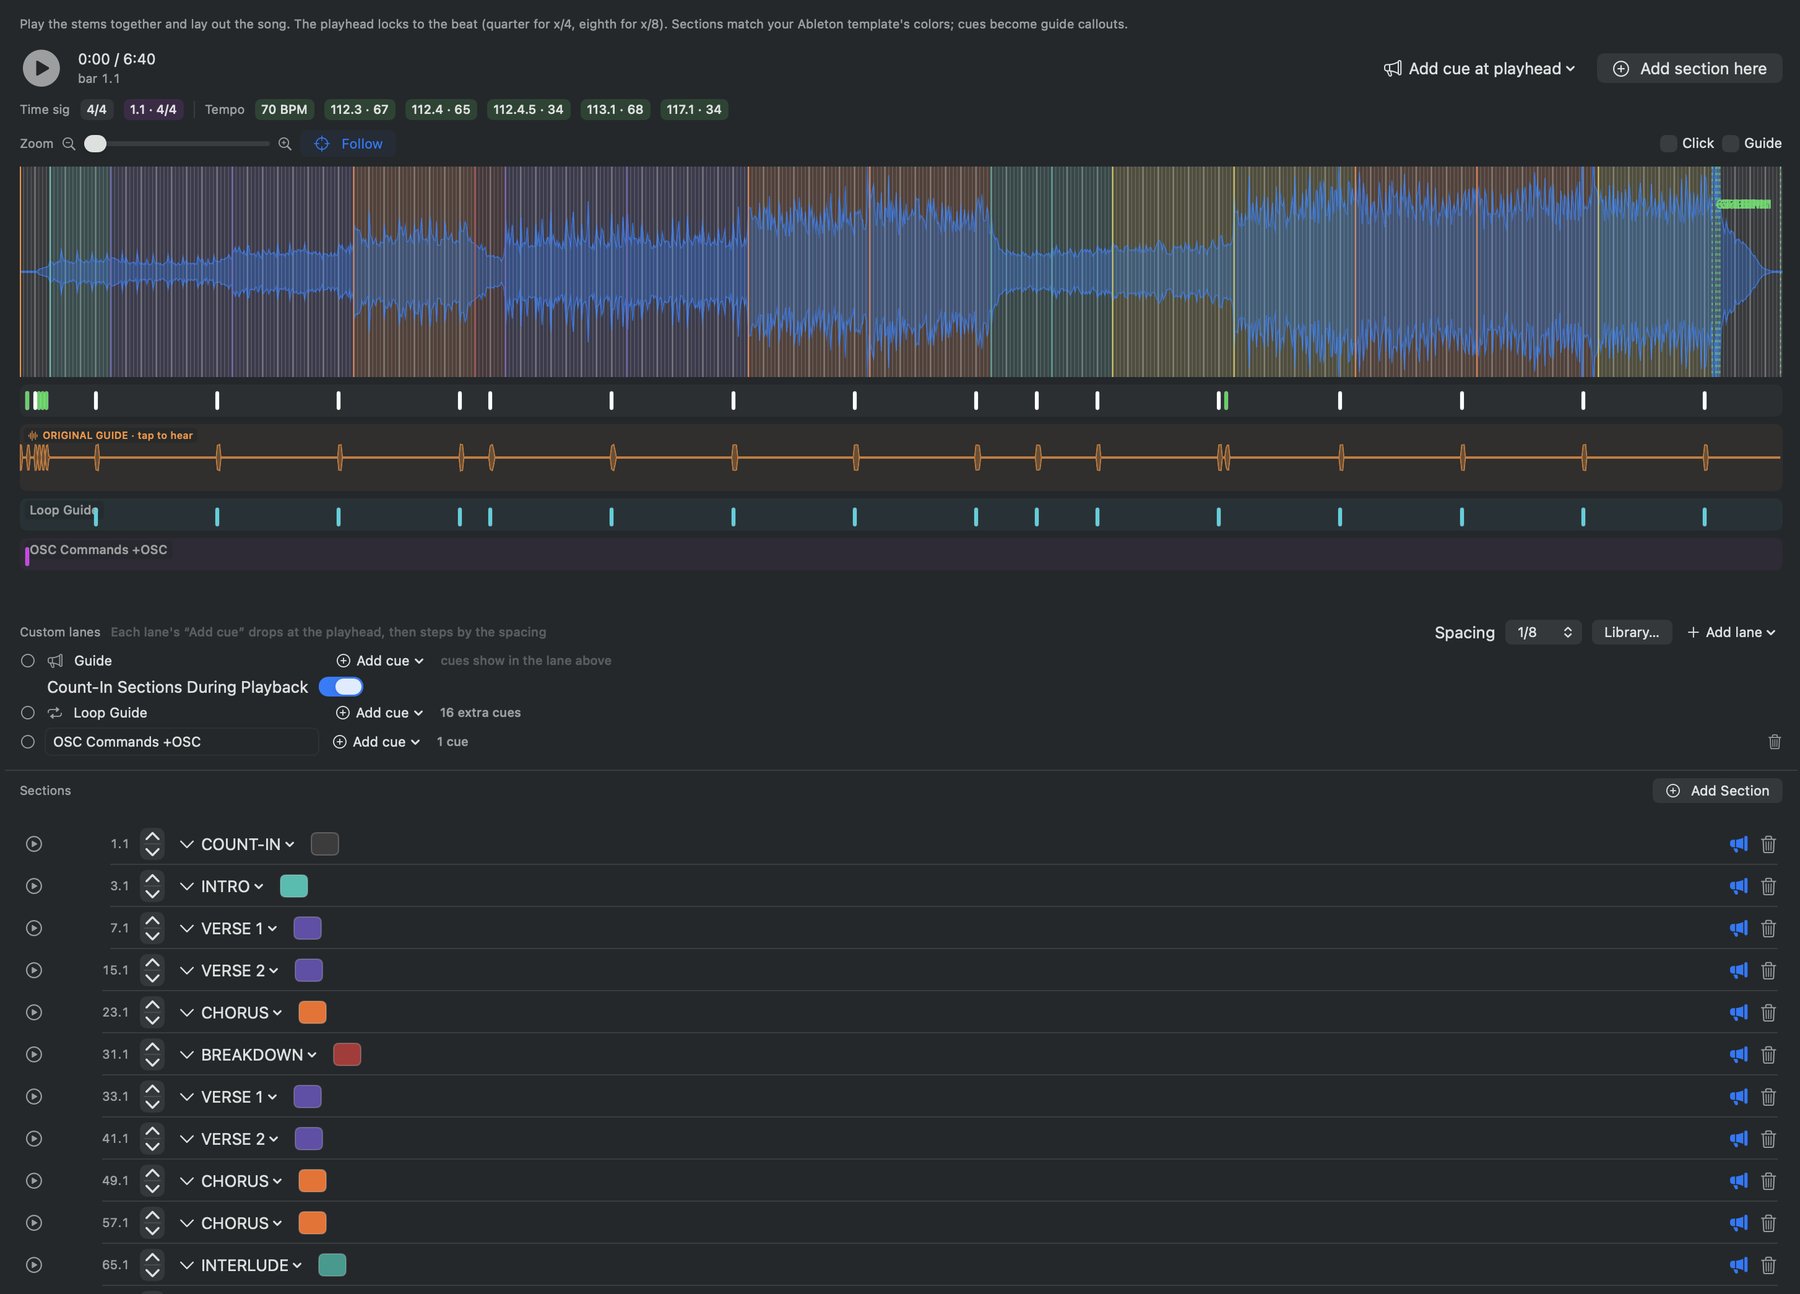
A tempo-aware, zoomable timeline that plays every stem together, so you lay the song out
by listening to it rather than guessing at numbers.
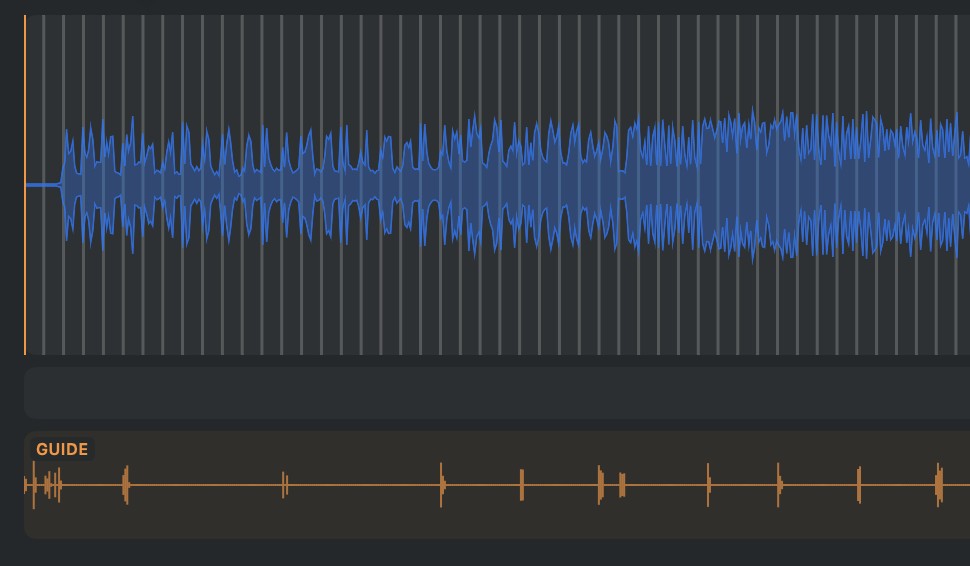
The whole arrangement in one view: waveform, sections, cues, playhead
It serves both kinds of song. What you can change depends on where the song came from.
Song
What you can edit
Manual song
Everything. Tempo, time signatures, sections, count-in, and cues.
MultiTracks download
The tempo map and time signatures come from the download and are locked. Sections, section cues, and performance cues are fully editable and feed the build.
This replaced the old Guide Cues sheet. Cues are no longer edited in a separate
window, they are edited here, against the audio you are hearing.
Playback and transport
Play, Click, Guide, Follow, zoom
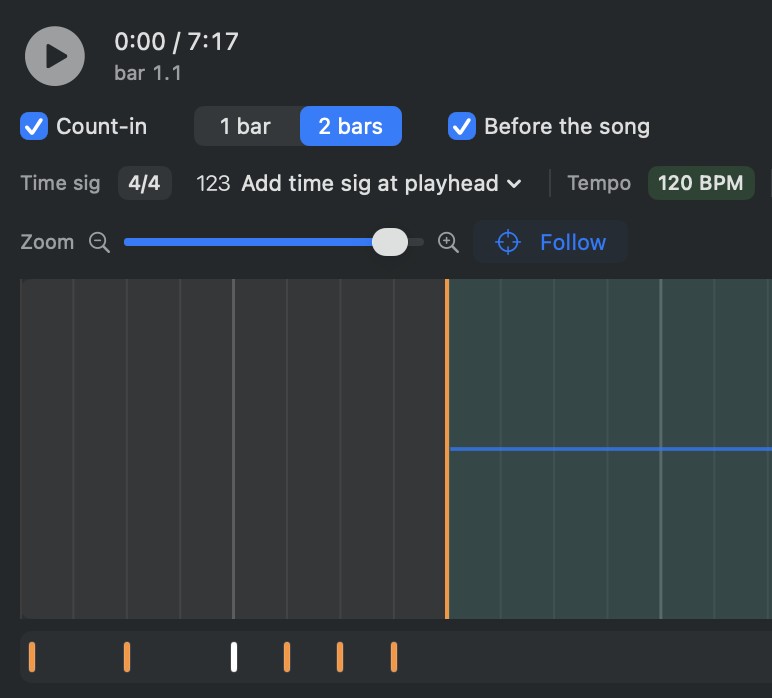
Play or scrub the full stem mix. The playhead locks to the beat, quarter notes for x/4 and eighths for x/8.
Playback is sample-locked. Stems, click, and guide all start on one shared clock, so nothing drifts against anything else.
Click and Guide play along with the mix using the exact sounds you picked in Settings. Both are rendered in the background the moment the editor opens, so switching them on is instant instead of a wait.
Follow keeps the playhead centered while you play. Scroll away and it turns itself off. Press it again to snap back.
Zoom stretches the timeline from 1x to 16x.
Hover the waveform and it tells you which section you're over, without having to
look up at the markers.
The playhead runs through every lane, not just the waveform, so you can see where
you are against the cues as well as the audio.
Right-click a lane to add a cue right there.
The original guide strip sits under the main waveform, where you can tap it to hear what the
download actually said.
Play and scrub run off a single cached stereo mixdown rather than mixing every stem each time, so
the timeline stays quick on a twenty-stem song.
The Band waveform is the instruments only. Click and guide stay out of that
mixdown and play on their own lanes, so what you see and hear is the band, not the band plus a click
on top of it. That holds however the song got here, converted, built by hand, or opened out of the
Library.
Detail scales with the zoom, so it stays crisp close in and clean far out
Sections
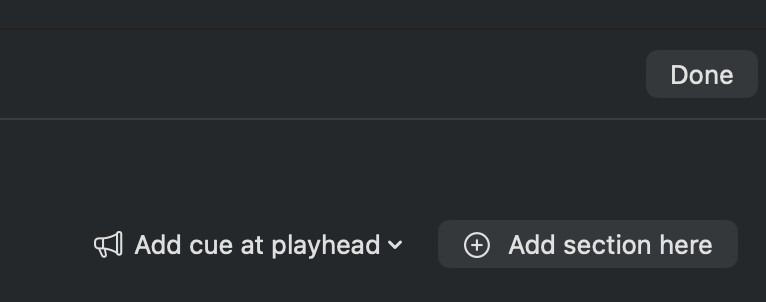
Add at the playhead, from the standard list or a name of your own
Add a section at the playhead from the standard list, Intro, Verse 1, Chorus, Bridge, Ending, or type
your own. Reorder by beat, relabel, delete, and nudge any section to an exact beat position. The names
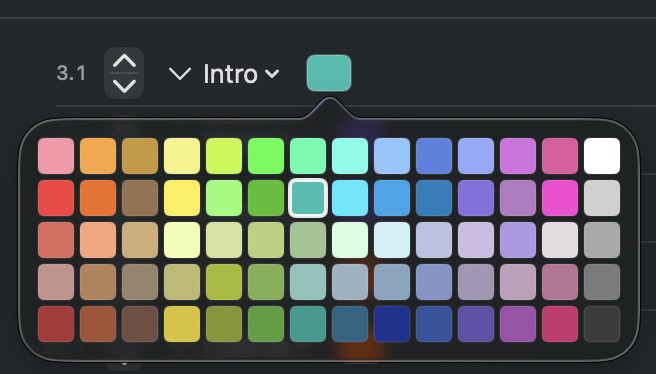
and colors here are what drive the SECTIONS lane and its clips in the built song.
The palette is Ableton's own, in Ableton's own order, so what you see here is what opens in Live
Count-in
Manual songs only, since a download brings its own beginning.
One bar or two, and optionally before the song starts
One bar or two, your call.
Place it before the song and it becomes a real lead-in on negative beats, so the count does not eat into your first bar.
The spoken ONE, TWO, section name, and count are generated for you, and the count-in shows up as its own section clip.
Cues
Section callouts land one bar before each section. Performance cues go in wherever the playhead is.
Both appear as ticks under the waveform that expand to the full label when you hover. Drag one to move
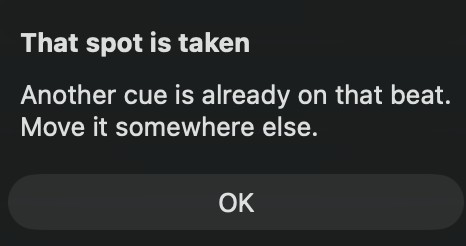
it, relabel or delete it from its context menu, and if two would land on top of each other you get a
warning rather than a mess.
Tick
What it means
White
A section callout, placed from the arrangement itself.
Green
Matched to the waveform correctly. Nothing to do.
Orange
Matched, but not for certain. Worth a listen.
Red
Something is there, but it could not be matched. It needs a name from you.
White, a section callout
Green, matched. Red, heard but unmatched
Orange, matched but not for certain
Drag to move, with a warning if two would collide
The click stops an eighth-note into the ENDING section, so it gets out of the way of the
last chord instead of ticking through it.
Time-signature changes
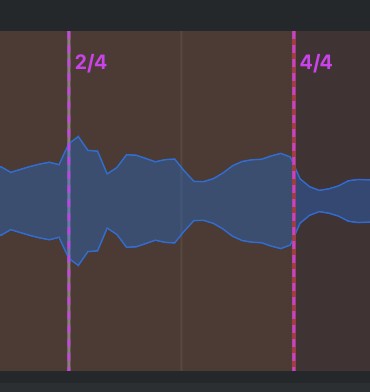
Snapped to the bar, driving the grid, the click, and the build
On a manual song, add a change at the playhead and it snaps to the bar. It drives the grid, the click
subdivisions, and the build. On a download, meter changes come from the source and sit on the grid as
read-only markers.
Your own lanes, on the same timeline
The lanes above are the ones BuildAble builds for you. You can also add your own OSC and MIDI lanes
here and place cues on them, with drawn CC envelopes if you want them. Section 21 covers that in full.
Section 13
Import a click or guide
Have the click track for the song? Then do not type a tempo. Hand BuildAble 12 the file
and let it work the map out from the hits.
Both live on the Sections timeline, and both are for manual songs, where the tempo is not already
decided for you.
Import tempo or click, and Import guide
Import tempo or click
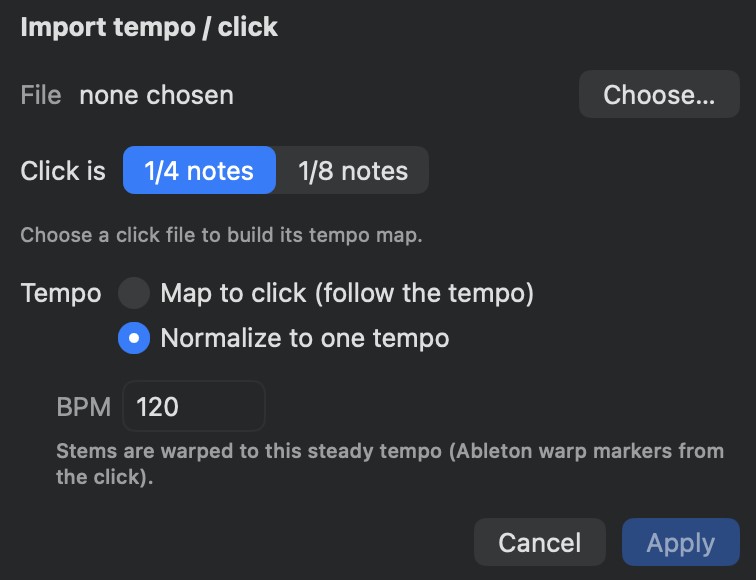
Pick the file, say what the click is counting, then choose how the song sits on the grid
Pick a click file, or use the one BuildAble finds in the folder.
Say whether the click is counting quarter notes or eighths. It cannot know this by listening, and getting it wrong halves or doubles your tempo.
It builds a tempo map from the hits, then tells you what it found: how many hits, and the average BPM.
Then choose how the song should sit on the grid.
Choice
What happens
Map to click
The tempo follows every hit, a per-beat map. The bar and beat grid lands exactly on the click even where the playing drifts. Stems play unwarped, so the audio is untouched.
Normalize to one tempo
Snap to a single steady BPM, prefilled with the detected average and editable. The grid is rigid now, so every stem is warped with Ableton warp markers to keep it lined up.
Which one? Map to click keeps your audio exactly as recorded and is the safer
choice for a live take that breathes. Normalize gives you a clean, steady grid to edit and loop
against, at the cost of warping every stem.
Warp modes
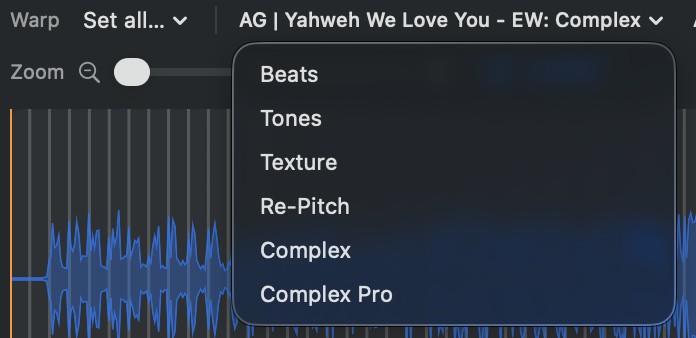
Normalize only, since nothing is warped when you map to the click.
One algorithm per stem, or Set all at once
Choose the algorithm per stem: Beats, Tones, Texture, Re-Pitch, Complex, or Complex Pro. Complex is
the default. Complex Pro suits vocals and full mixes, Beats suits
drums and anything percussive. Set all… applies one choice to every track at once.
Import guide
The guide sits under the timeline with its cues detected against your sections
Pick a guide file, or let BuildAble read the one named Guide in the stem folder. Its
waveform appears under the timeline and its cues are detected against the song's sections and tempo,
exactly the way a MultiTracks guide is, see Section 14.
Files named click or guide are control material, not instruments. They stay out of
the mix waveform so they cannot skew what you are hearing or seeing, and they stay out of the built
session when the matching Click or Guide control track is on, because BuildAble builds its own. Turn
that control track off if you would rather keep the raw audio as a stem.
Section 14
Guide cues
The +GUIDE lane is the most valuable thing BuildAble 12 builds, and the
hardest. It's assembled in three layers, and they never collide, because the reliable ones always win.
Why it's layered
The count-in and the section cues come from things the song knows, its meter and its
locators. Those can't be wrong. Performance cues come from listening to the guide stem, which is fuzzy
by nature. So the skeleton is built from fact, and detection is only ever allowed to fill the gaps
between. A section name can never be produced by detection, and nothing ever stacks on the same beat.
The count-in
Synthesized from the meter, in meter beats, six of them in 6/8, not four. The last bar
names the section you're about to play, then counts you into the downbeat.
Section cues
One cue, one bar before each locator, named from the locator, and spelled the way your
library spells it, so you hear "post chorus" and not the pad's abbreviation.
Performance cues
Only the spoken performance vocabulary: BUILD, DRUMS IN, HITS, ALL IN, SWELL, BREAKDOWN, TURNAROUND,
VAMP, TAG. Two independent detectors find them:
Audio fingerprint, the family's cue recordings matched against your song's guide
stem. MultiTracks reuses the same recordings across songs, so the match is near-exact.
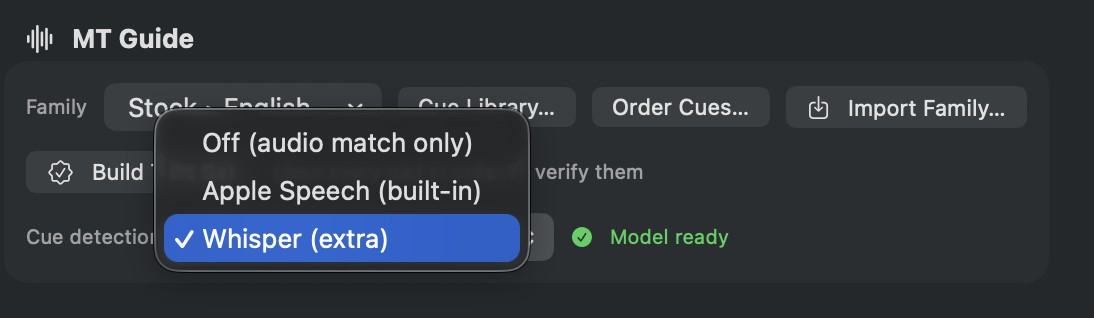
On-device speech, the guide is transcribed and words are mapped to cues. Choose
the engine in Settings: Off, Apple Speech (the default), or Whisper.
Anything spoken that still can't be named is surfaced as a blank slice for you to
label, it isn't silently dropped.
Nothing leaves your Mac. Both the fingerprint match and the speech recognition run
on-device.
Where you see them
Cues live on the Sections timeline now, not in a separate sheet. Every detected cue
is a tick under the waveform, colored by how certain the match is, and you drag, relabel, or delete it
right there against the audio you are listening to. Section 12 covers the timeline in full.
Choosing the detection engine
Settings, MT Guide: pick how hard it listens
Engine
What it does
Off
Audio fingerprint only. Fast, and still catches everything MultiTracks reused.
Apple Speech
Built in, on-device, and the default.
Whisper
Optional, and more accurate. Downloads a model once on first use.
Whisper used to be the slow choice. It is not now. Transcription is chunked by voice activity, so the
silent stretches of a guide stem are skipped and the spoken chunks are transcribed in parallel, and the
model pre-loads in the background as soon as you select it, so your first run is not the download and
compile hit. If speech is unavailable for any reason, detection falls back to the audio match on its
own, without asking.
How the lane actually plays
The guide is one Live-authored 128-pad drum rack that BuildAble repoints at whichever
family you chose. One rack, one layout, every song. That's what makes a callout play in full instead of
getting clipped, and land on the pad it's supposed to instead of the pad next door. It's also what the
Library's Make consistent checks against when it looks for drift.
Make New Cue
When the detector hears something it has no recording for, you don't have to go and record one.
Right-click the Sections waveform, or right-click the cue itself if it came up red or
orange, and Make New Cue. Name it, crop it, and it's imported into your voice family and
placed on the timeline in one go.
The next song that says the same thing matches it without asking.
There is a second way to do all of this. If you'd rather AbleSet spoke the cues
itself, turn on Cues mode and it will, drum rack and all replaced. See the next
section.
Section 15
AbleSet Cues mode
The other way to get spoken cues. Instead of BuildAble assembling a drum-rack guide,
AbleSet's own Cues plugin speaks them, and the build hands it what to say.
Turn it on in Settings ▸ Cues. Everything else about the song is unchanged:
same click, same sections, same lyrics, same routing. Only the guide layer is built differently.
What changes in the built song
Normal guide
Cues mode
A drum-rack guide lane, assembled from your family's recordings
The template's +GUIDE track is kept as it is, hosting the AbleSet Cues plugin
A +LOOPGUIDE lane that re-announces on a loop
No +LOOPGUIDE. AbleSet handles it
Section count-ins built onto the guide lane
Section count-ins spoken from the SECTIONS locators
Performance cues played as audio
Performance cues become a /cues/say lane, a MIDI track whose clip names are the words
The voice
Two choices, and you can change your mind later:
Generate, and AbleSet speaks the phrases in its own voice. Nothing to install.
A WAV family, one of yours. The family's recordings are copied into
<Project>/AbleSet/Cues/Custom [Family]/, so the plugin speaks in the voice your band
already knows. Anything the family doesn't have a recording for falls back to the generated voice
rather than going silent.
Converting a library you already built
You don't have to rebuild your songs by hand. Direct the conversion at a whole library and it moves
every song over in one pass, with a progress overlay while it works.
Phrases that have no matching WAV stop and ask, once, in a match-or-add sheet: pick
an existing recording from the family or import one. What you pick is remembered as a family-wide alias,
so the same phrase in the next forty songs goes through without asking again.
Which one should you use? If your rig already runs AbleSet Cues, Cues mode keeps
one system in charge of speaking and nothing doubles up. If you want the exact recordings you have
spent time collecting, and you want them to play the same on a machine with no AbleSet running, stay
on the drum-rack guide. Both are fully supported.
Section 16
The slice editor
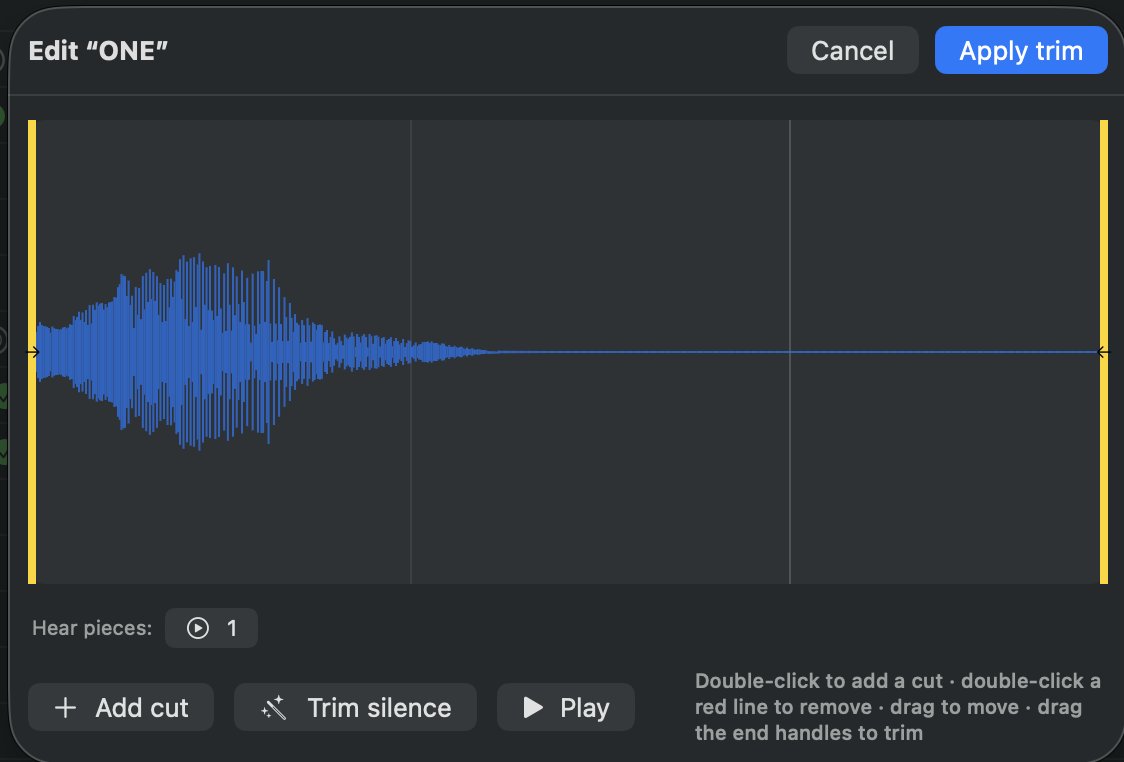
Sometimes the guide says two things in one breath, and the detector hears one blob. The
scissors button opens the waveform and lets you crop the part you actually want.
The whole phrase, with the quiet around it · drag the yellow handles to crop
You see the whole phrase, with the quiet either side of it, so you can tell where
the words actually start and stop.
Drag the yellow handles to take in more or crop down to just the spoken part.
Trim silence does the obvious thing automatically.
Play it before you commit, then Use crop.
Crop a phrase once, name it, and it goes into your family. From then on the detector recognizes it
on its own, so every song you convert after that gets better.
Section 17
Lyrics & chords
Type the words under each section and AbleSet shows them on the big screen. The
structure is fixed for you, so you can't put the chorus in the wrong place.
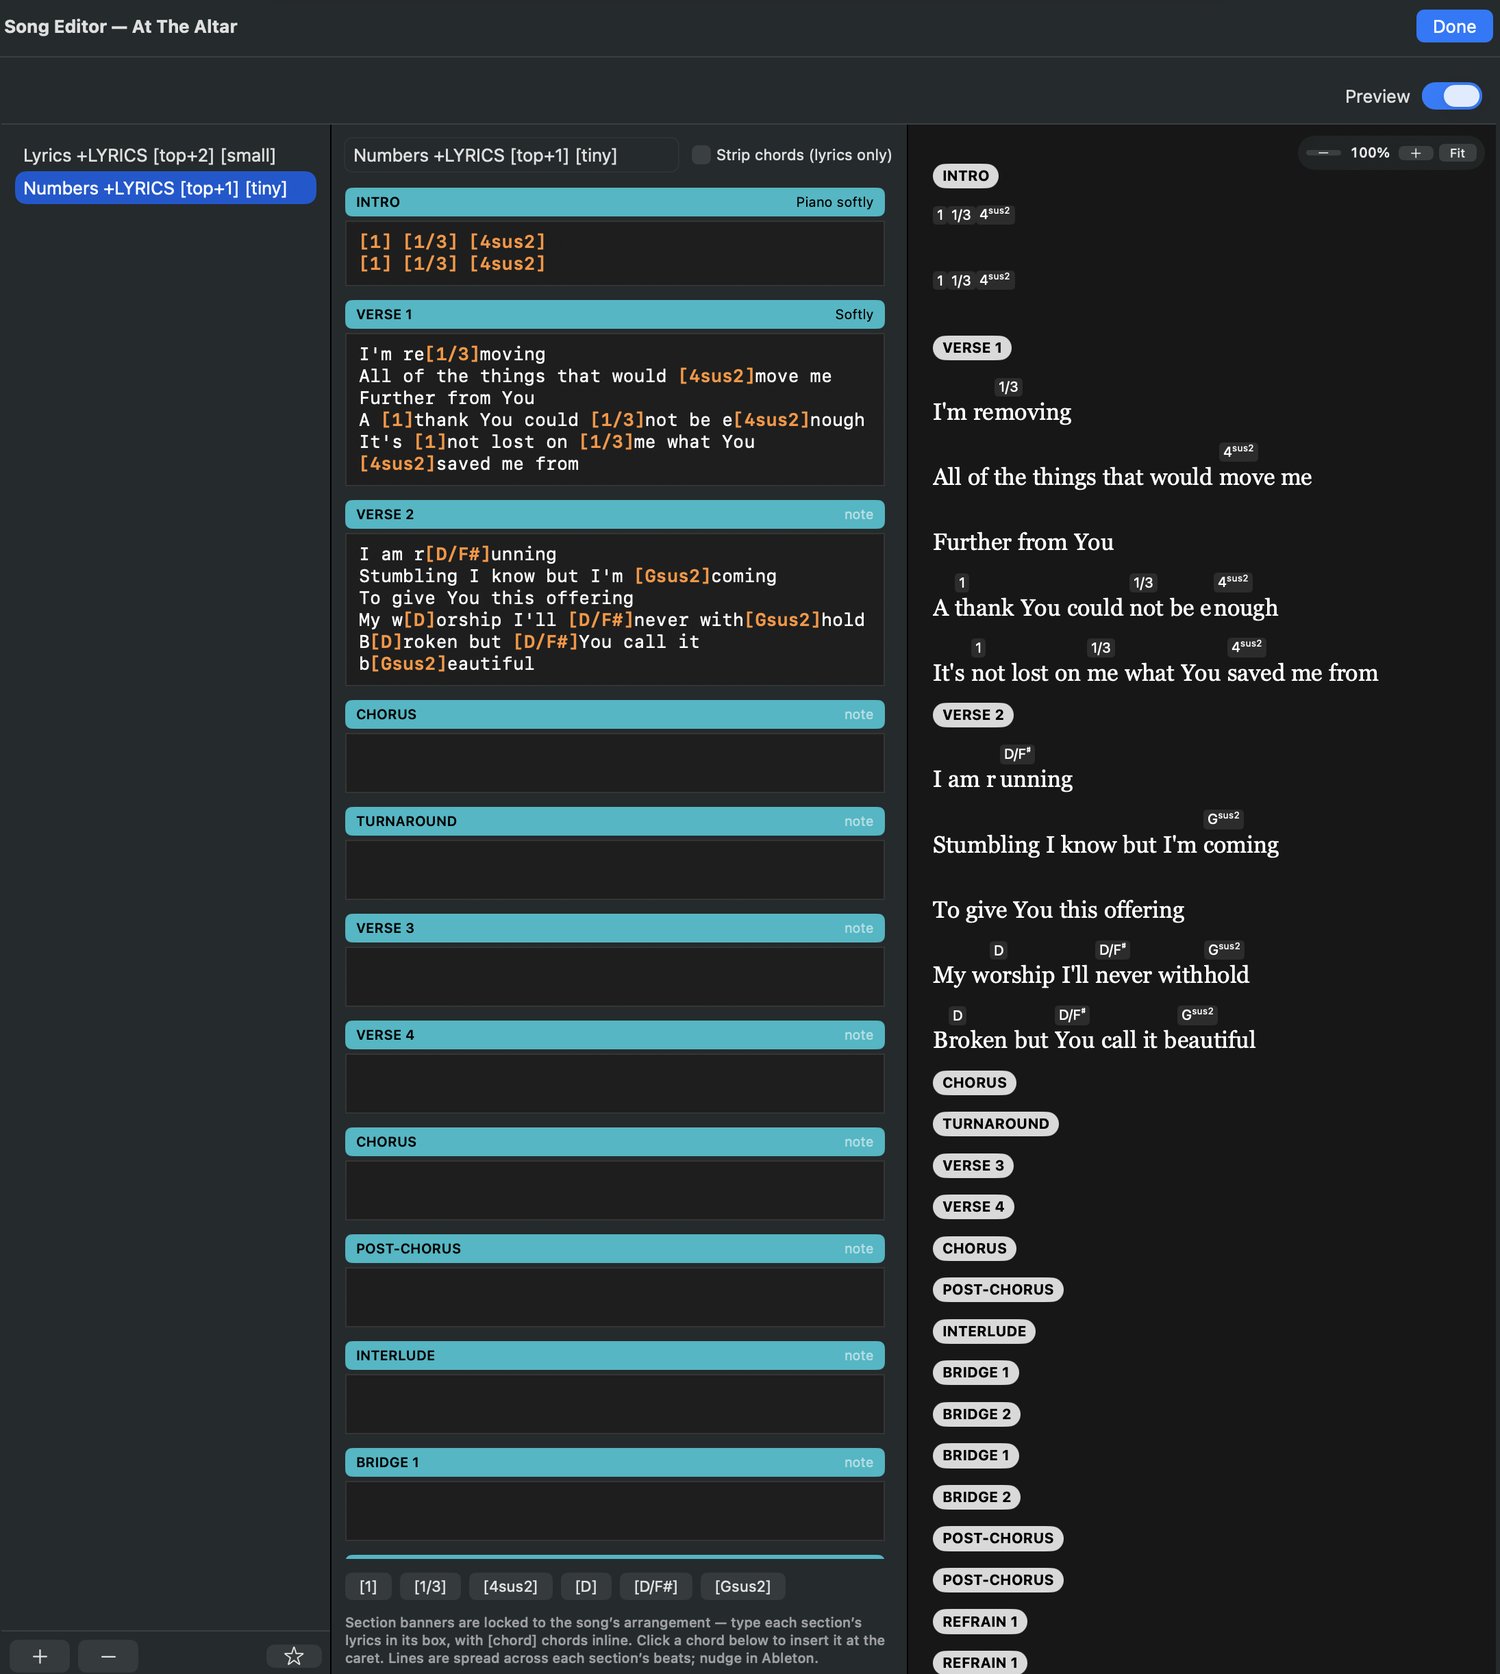
Locked section banners · chords inline · and on the right, exactly what AbleSet will show
How the editor is built
Section banners are locked. Every locator in the song appears as a full-width
banner, in order. You can't add, remove, or reorder them, they mirror the arrangement exactly,
because the arrangement is the truth.
One box per section. Type that section's words in the box beneath its banner. The
boxes grow as you type.
Chords go inline in brackets: [G], or [1] for numbers.
The chord palette under the editor holds the chords already used in this song -
click one to drop it at the cursor.
Lanes, and the strip toggle
You can build more than one text lane. A Lyrics lane strips the [chords]
out and shows plain words, and the preview hides them too, so the lane looks exactly like the finished
session; a Numbers lane keeps them. Same typing, two lanes, two
audiences, the singer and the band.
The preview is the real thing
The right-hand panel shows exactly how AbleSet will render the lane: section pills, chords floated
over the right syllables, and overflow turned red when a line won't fit the screen.
You'll know it's too long before you're on stage looking at it.
Import from a chart
Rather than typing, you can pull the words and chords straight out of a chart. New in
1.0.4.
The Import button sits at the bottom of the track list, and on the empty-state
screen when a song has no lyrics yet. Two ways in:
From PDF or text file… for a chart PDF or a plain-text chart.
Paste chart text for something you have already copied.
Either way a review window opens first. Nothing touches your song until you press Import, and
everything in that window is editable, so you fix problems before they land rather than after.
What it reads
MultiTracks Chart Pro, in letters, Nashville numbers, Roman numerals, or DoReMi
solfege. Chords are placed above the exact word or syllable they fall on.
SongSelect number and chord charts.
Your own text charts, using a simple {Section} and
[chord] format. There is a "Make your own chart" help panel in the import window.
Lyrics-only and chords-only exports.
Song maps, which come in as section notes and nothing else.
Sharps and flats come in exactly right
Chart Pro doesn't put accidentals in the page as text. It draws them as tiny graphics. That's why
chart imports used to get them wrong, and it's fixed in 1.1.2: BuildAble reads them straight off the
page and puts the right # or b on the chord.
It works in sharp keys and flat keys, in every notation, and it holds up on the complicated ones,
F#m9, E/G#, 7#9#5, maj9#11, Nashville
b7.
It doesn't guess. A chord it can't read cleanly is flagged for you to look at
rather than quietly turned into its best approximation. A wrong chord you don't know about is worse
than a gap you do.
The warnings box
Anything questionable is listed with its location, so a fast import can't slip a bad chord past you.
Read the list, fix what needs fixing in the text pane, then import.
The original, right beside it
On a PDF import, turn on Original and the source chart sits next to the parsed text.
Move the cursor and the PDF turns to the page that line came off, so checking a chord is a glance rather
than a hunt.
Repeated lines go to the right copy too. Put the cursor in the last chorus and you get the last
chorus, not the first one that happens to match.
Choosing where it goes
The review window lists every lyric lane in the song as a checkbox, so tick each lane the chart
should fill. One chart can feed several lanes at once, or you can import separate PDFs, lyrics, chords,
and numbers, into their matching lanes. You can also create a new Lyrics, Chords, or Numbers lane right
there. Any lane that already has content is flagged, because importing replaces it.
On a MultiTracks download, your sections win
A download already carries the correct sections, so import matches the chart to them and fills in
the gaps. Section names and arrangement stay exactly as they are; the chart only supplies words and
chords.
Section notes, filled in for you
Chart Pro prints performance cues beside each section, things like "Piano line," "Breakdown," or
"Build with energy." Turn on Fill empty section notes from the chart in the review
window and those land in each section's Note. Notes you have already written are never overwritten.
Song info
On a manual song, import can also set the tempo, time signature, and key from the
chart. On a MultiTracks download those are left alone, since the download is the source
of truth. Title and artist are only filled in when they are blank.
Two limits worth knowing. Letter and solfege charts can lose sharps and flats,
which is a limitation of how those PDFs are drawn rather than a bug; the app warns you and points you
at the Numbers chart, which is always clean. And a scanned or image-only PDF cannot be read at all,
because there is no text in it to extract.
Time Lyrics
Words on the screen are better when they arrive when they're sung. Time Lyrics plays
the song and you tap along, one tap per line, and that's the timing.
Re-time from here, when the first half is right and the second half isn't. You
don't redo the whole lane to fix the last chorus.
Copy timing from another section or another lane. The line counts don't have to
match, so the numbers lane can borrow the lyrics lane's timing.
A blank line is a stop, a held gap where nothing should be showing.
The [>]pickup marker for a line that starts before the bar does.
Snapping to the 16th note, autoscroll with the current line highlighted, and
right-click to clear one line's timing without touching the rest.
Timing survives the round trip. Open a finished song again and its lyrics
and its per-line timing come back in with it. You pick up where you left off rather than
tapping the whole song out a second time.
Size classes go in the lane name, [tiny], [small],
[large]. And Add my default tracks seeds the lanes you always build.
Copy text, or pull another lane across section for section
Section 18
Section notes
A word to yourself, per section. full band. acapella. drums only.
One line per section. Blank is fine.
Edit them on the right of each lyrics banner, or in the Section Notes sheet, they're the same field.
On convert they're appended to the section label:
INTRO {full band}
Leave one blank and nothing is added. It's a small feature that survives contact with a real Sunday:
the thing you'd otherwise be whispering across the stage is written on the screen.
Section 19
Returns & routing
A return is a bus your stems send to. The return's output decides where that
audio physically leaves the computer. The patchbay wires the two together.
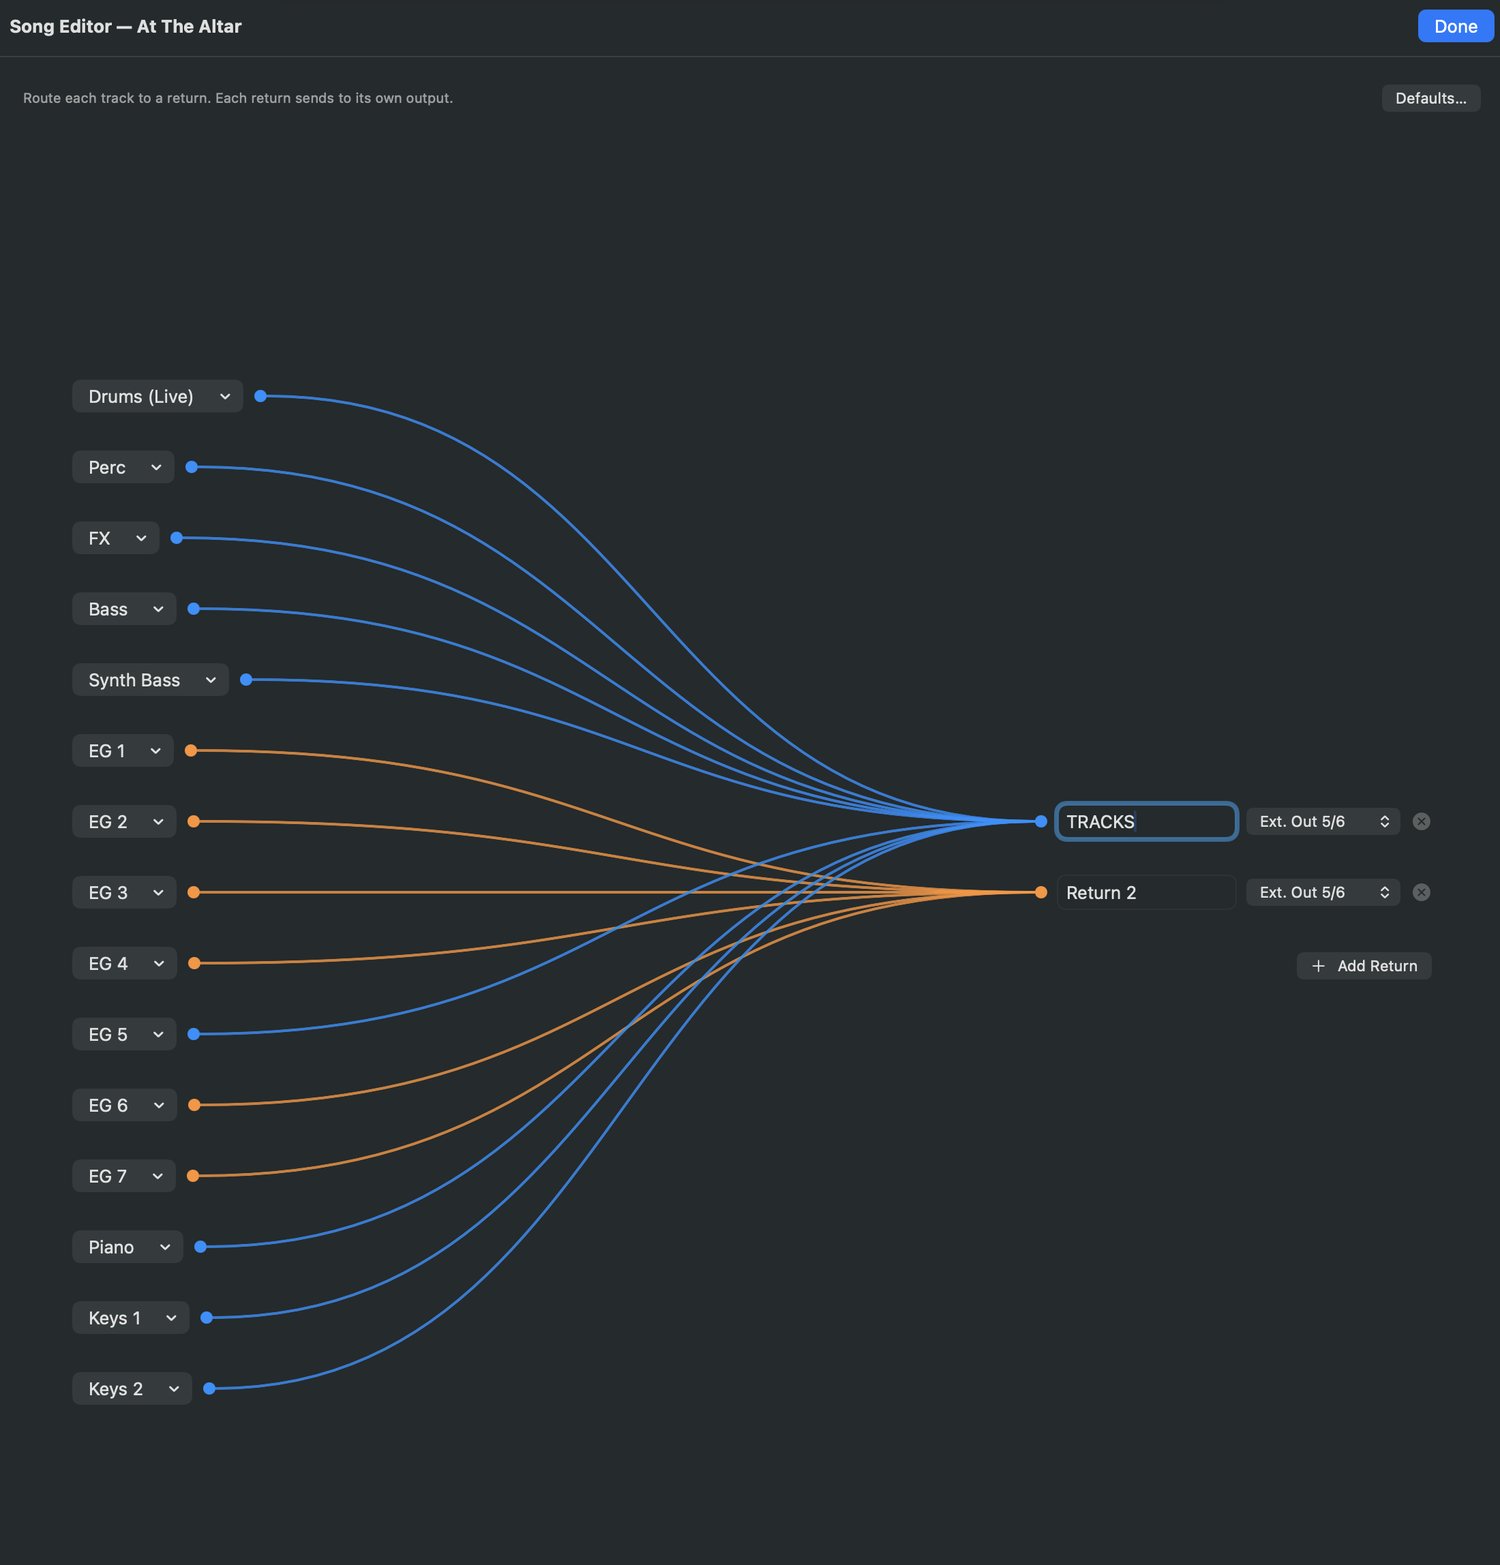
Every stem, wired. Colored by the return it lands on.
Rename any return, set its output, add or delete returns.
Colored connectors show every stem's destination at a glance.
Send each track to its own bus and output, or flow them all through one, whatever your rig needs.
Defaults do the work
Every new song starts from a global template, so you set this up once rather than per song:
The default return is TRACKS +G:TRACKS → Ext. Out 5/6.
Routing rules can send stems to a return by name, KEYS _ catches
KEYS 1, KEYS 2, and so on (_ is a number wildcard).
Anything unmatched lands on the first return. Nothing gets orphaned.
Click, Guide, and Tracks each have their own global output in Settings, by default
Ext 7, Ext 8, and Ext 5/6.
Section 20
OSC commands
AbleSet can be told what to do by a clip name. BuildAble 12 lets you build those clips,
so a song can start its own loop, set its own tempo, or fire a notification when it hits a section. In
1.1 this lives entirely in the custom lanes, there is no separate OSC panel any more.
How it works
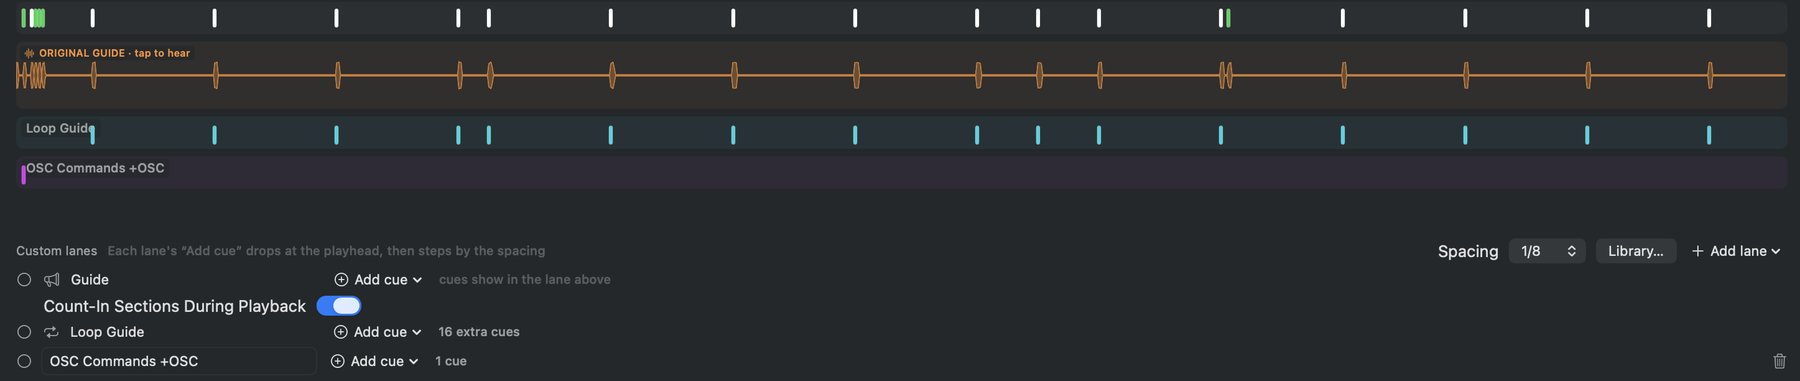
OSC is authored as a lane on the Sections timeline. Add a lane, name it as OSC, and
it becomes a lane whose clip names are messages. AbleSet reads the name and fires it. Chain
several with semicolons:
/global/play; /global/tempo 120
Name a lane as OSC and it loads AbleSet's command catalog on its own, so the
commands are there to choose from rather than to remember.
The command catalog is a searchable list of 50+ built-in AbleSet commands,
playback, loop, setlist, lyrics, mixer, interface, UI, notify, MIDI, devices, plus the ones you save.
Choose one to drop it into a clip, then edit the arguments.
Place a clip wherever you want the message to fire, exactly the way you place any other cue on the
timeline.
Section 21 covers building lanes, placing clips, and the CC editor in full, OSC is just one kind of
lane you can add there. The commands the autofill knows about are managed in Settings (Section 22), and
you can teach it new ones from AbleSet's own documentation.
OSC lives on the Sections timeline now: an OSC lane, with Library and Add cue beside it
Section 21
Custom control lanes
The built-in lanes cover what most songs need. When they don't, build your own: an OSC
or MIDI lane of your making, sitting on the Sections timeline next to everything else.
Adding a lane
Add a lane and name it. It sits on the timeline with the others, and its
Add cue drops at the playhead then steps by the spacing you set. Two lanes can share a
name if that's what makes sense to you.
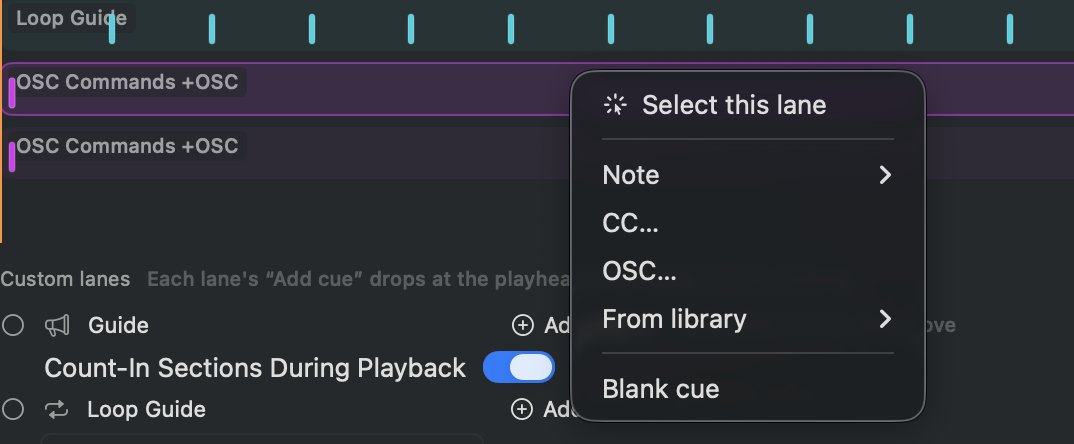
Right-click the lane and you get everything you can put on it:
Right-click a lane for what goes on it
Choice
What it puts down
Select this lane
Makes it the active lane, so clicking the timeline places on it.
Note
A MIDI note, picked from the submenu.
CC…
Opens the CC editor to draw an envelope.
OSC…
A command, typed or picked (below).
From library
Something you already saved in the Clip Library (below).
Blank cue
An empty clip to fill in later.
Writing an OSC command
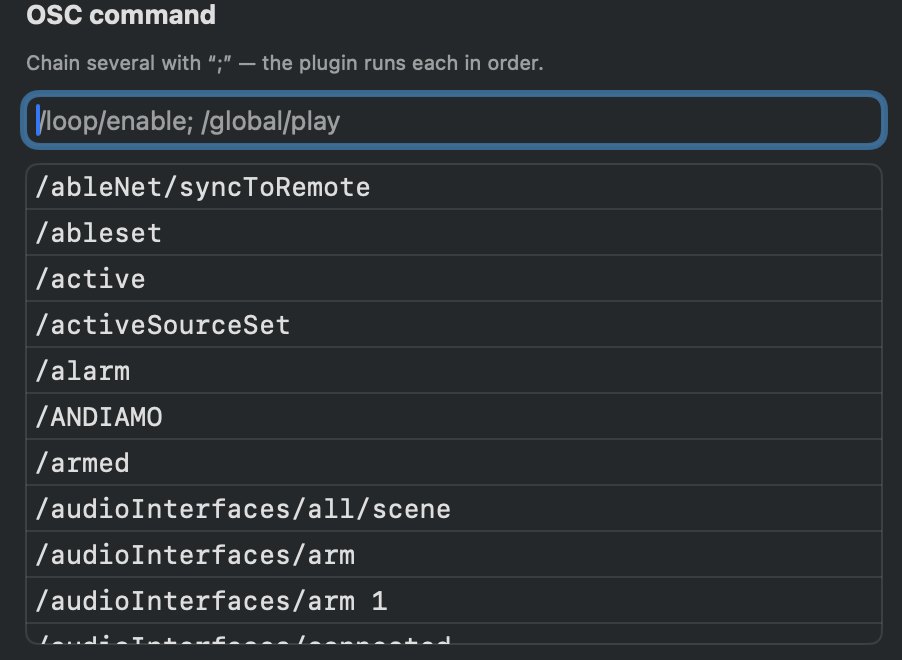
Choose OSC… and you get a field you can type anything into. Start with
/ and it autofills from every command it knows about, so you pick rather than remember.
Type a slash and the list comes up · chain several with a semicolon
Chain several with a semicolon and the plugin runs them in order, so one cue can do
a few things at once: /loop/enable; /global/play.
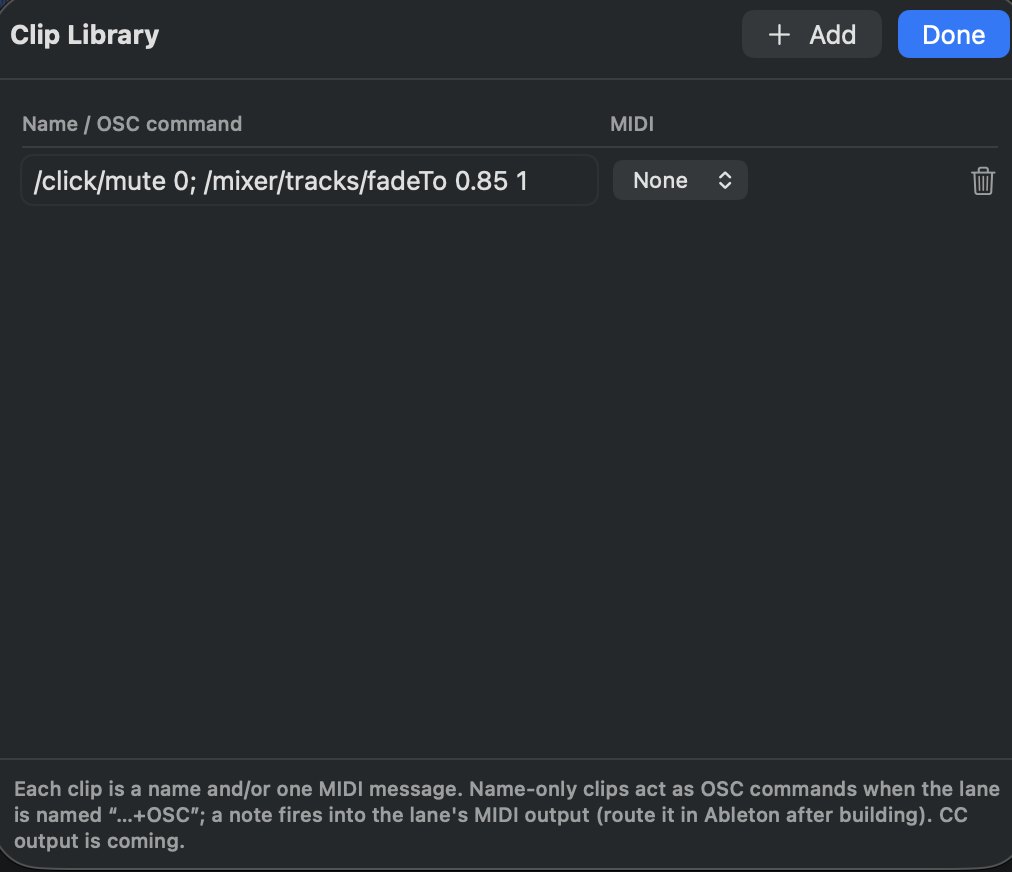
The Clip Library
The commands you actually use, you use over and over. Save one to the Clip Library
and it's a menu pick on every lane in every song from then on, instead of something you retype.
Save a command once · pick it from From library on any lane after that
A clip is a name, a MIDI message, or both, and which part does the work depends on
the lane it lands on:
A name-only clip acts as an OSC command when the lane's name ends in
+OSC. That naming is what makes the lane an OSC lane, so it matters.
A note fires into the lane's MIDI output. You route that in Ableton once the song
is built, the same as any other MIDI track.
A CC envelope can be saved here too. Draw it once, save it, and drop it on any
lane in any song after that instead of drawing it again.
It reads Ableton as well as writes it. Automation you drew in Live comes back into
BuildAble, multi-point curves and several controllers in one clip included, so opening a song again
doesn't cost you the work you did on the other side.
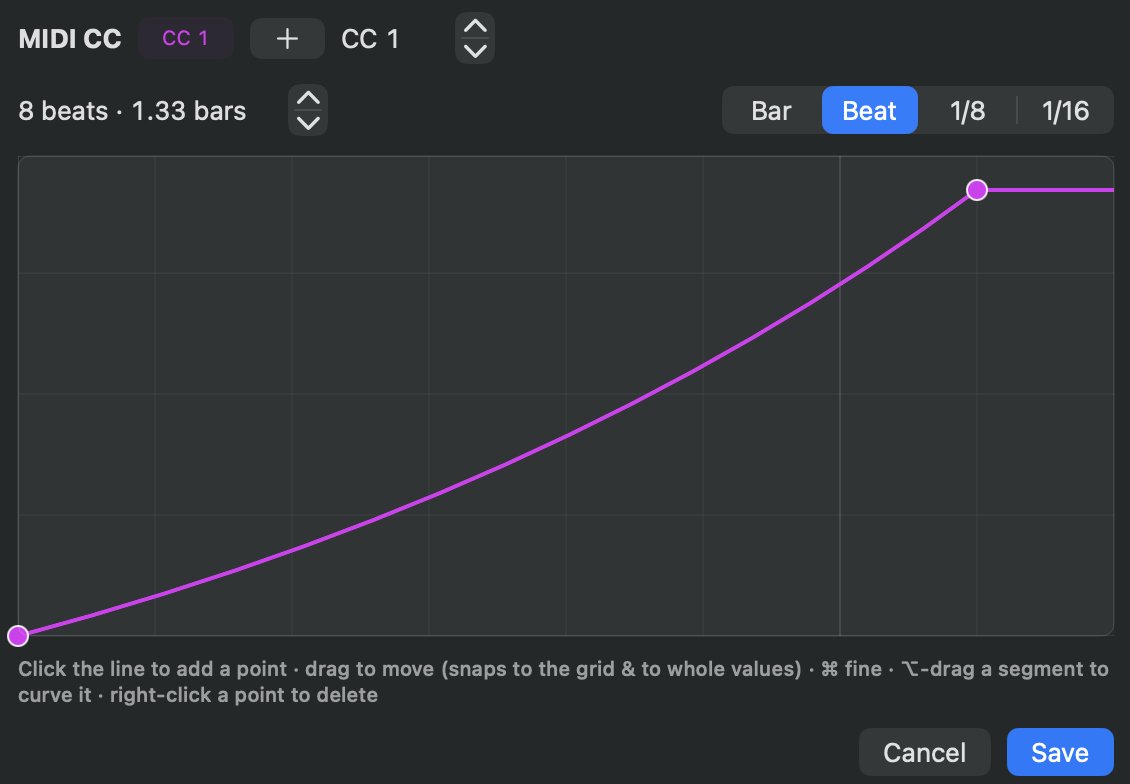
The CC editor
Any cue on a lane can hold a drawn CC envelope, not just a single value.
As many breakpoints as you want, dragged where you want them.
Option-drag a segment to curve it, a real bezier, up to plus or minus 300 percent,
so a fade can ease in instead of running straight.
Ramps over N bars, when you'd rather say how long than draw it.
Several controllers in one clip, so one cue can move three things at once.
Snap to the grid you picked, bar, beat, 16th, or 8th.
The readout is in bar.beat and counts your song's meter, so a 6/8 song gives you
six beats to a bar and 1.4 means the fourth beat of bar one. It gets finer as the grid
gets smaller.
Click the line to add a point · drag to move · option-drag a segment to curve it
These aren't a preview of something. They're written into the session as real OSC and MIDI clips
with real automation envelopes, so what you drew here is what Live plays.
Section 22
Settings
The gear, top-right. Set this up once and every song you ever convert inherits it.
Set Up… / Re-run Setup… adds more sounds to your library (Section 03), with a link to
the free MultiTracks pack if you want it.
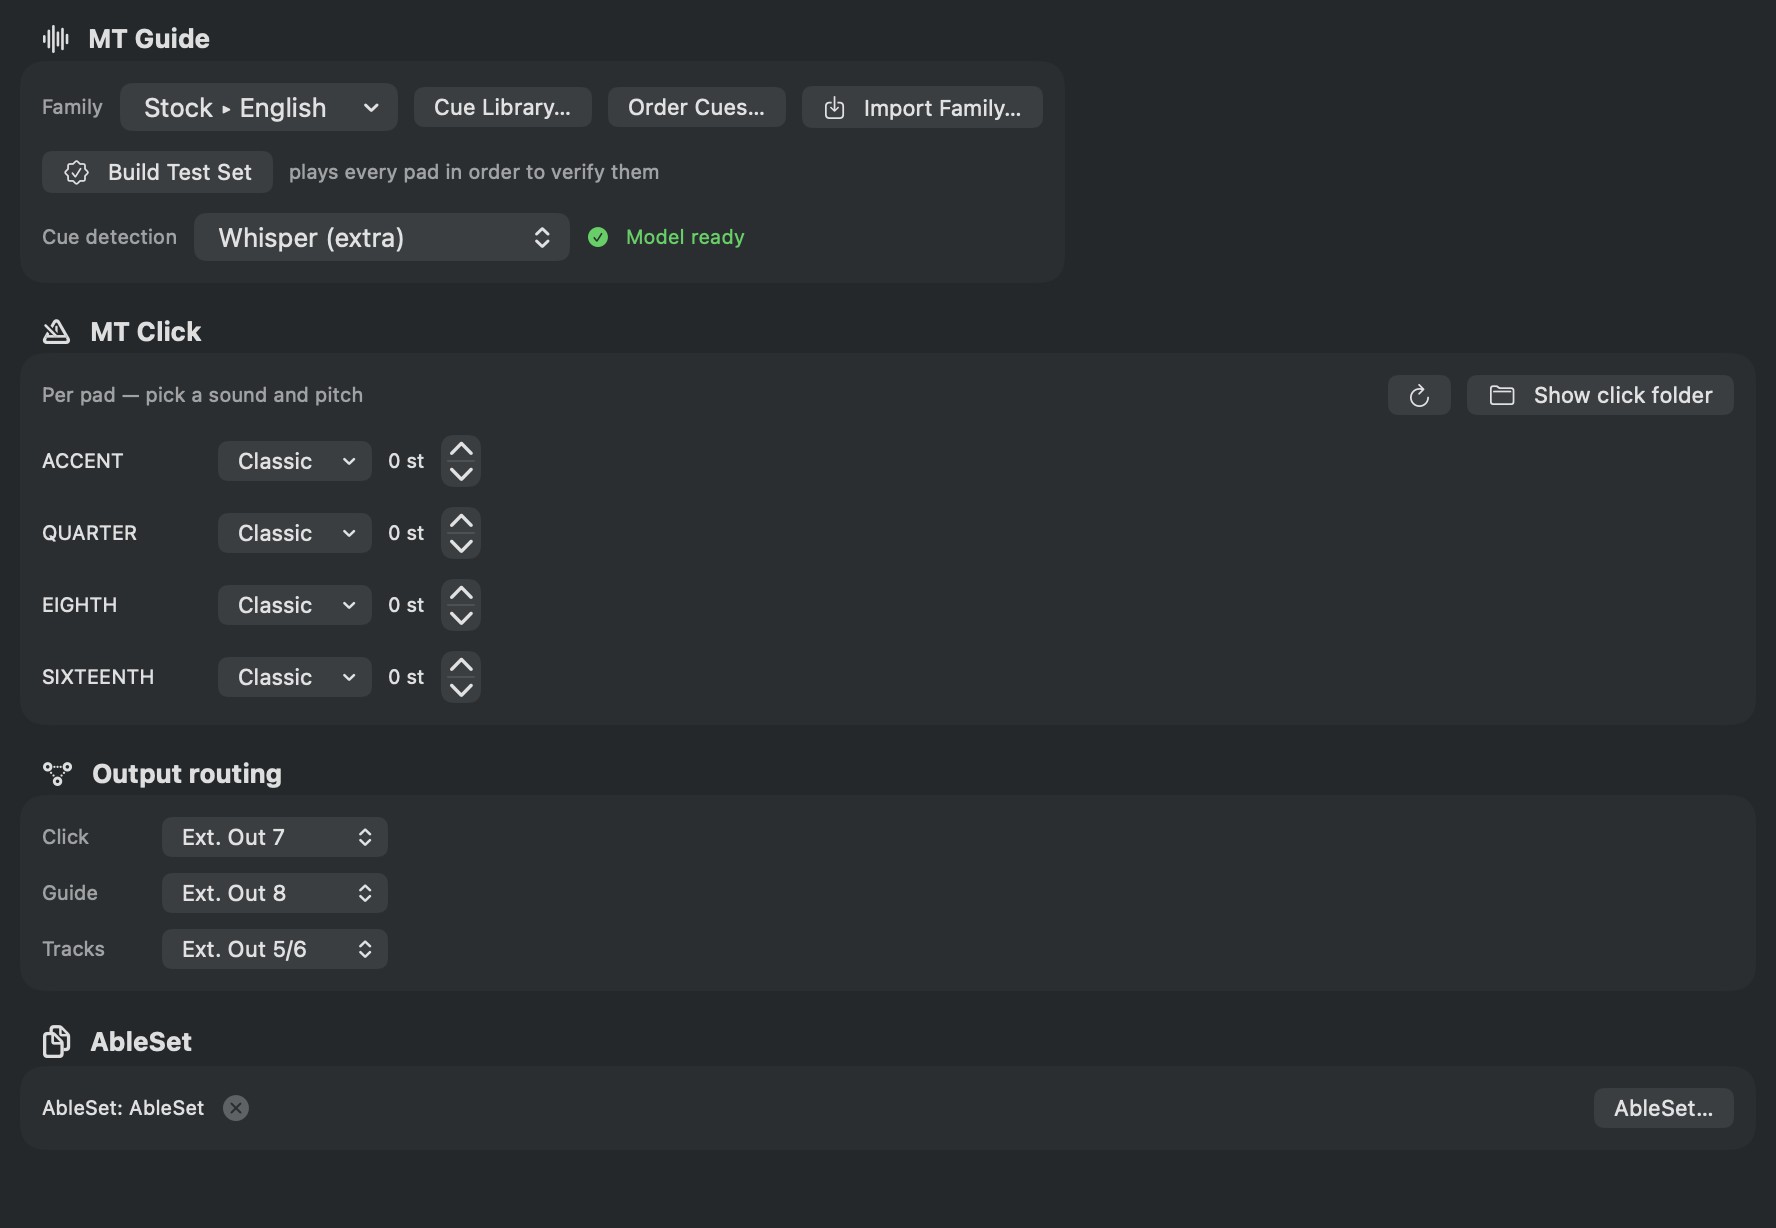
MT Guide
Family, the voice. Cues resolve strictly within it.
Cue Library…, browse and play every cue you own. Add Cue…
imports your own recording into that family, and it's available everywhere from then on.
Order Cues…, the display order. Inside it, Reorder drum rack…
permutes the actual pad notes (it asks first, and it applies to future conversions).
Build Test Set, a session that plays every cue you own, in order. Ten seconds to
hear your whole voice.
Cue detection, Off (audio match only), Apple
Speech (the default), or Whisper (an on-device model, downloaded on first
use). If Whisper isn't available it falls back to Apple Speech on its own.
MT Click
Per pad, accent, quarter, eighth, sixteenth, pick the sound and the
pitch (±24 semitones). Show click folder opens the folder so you can
drop your own clicks in.
Output routing
Click (Ext 7), Guide (Ext 8), Tracks (Ext 5/6) -
Master, or any external mono out or stereo pair.
Cues
AbleSet Cues mode on or off, and the voice it speaks in. The section after the guide
cues covers what changes when you turn it on.
AbleSet
Choose an AbleSet template folder and it's copied into every song you convert. This
is what makes a converted song open ready for your rig rather than ready for a blank Ableton.
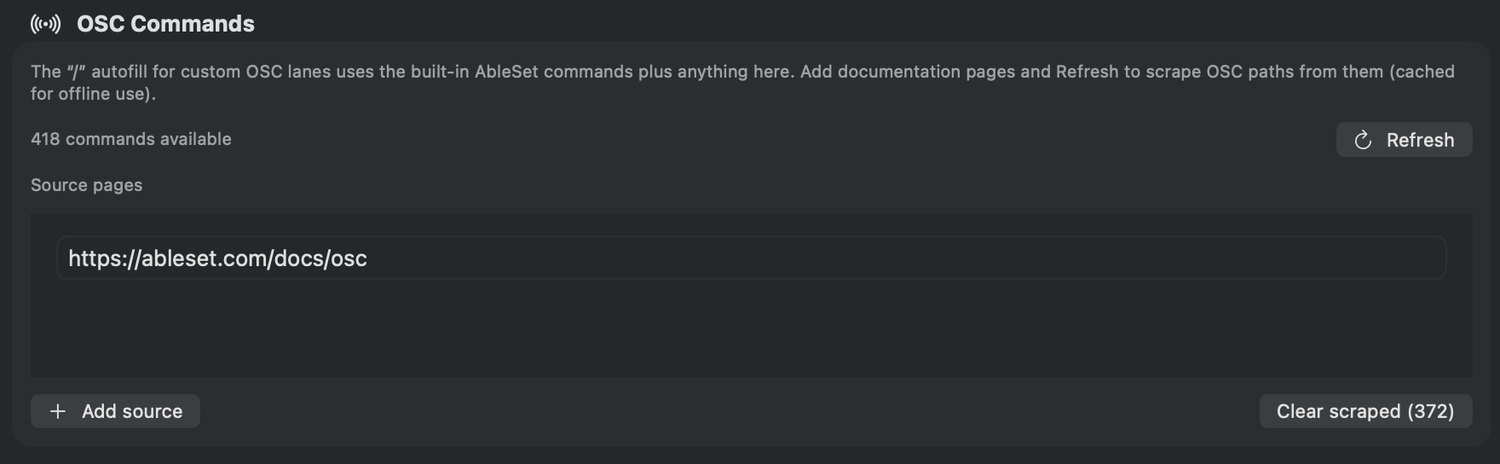
OSC Commands
What the / autofill offers you on a custom OSC lane: the built-in AbleSet commands, plus
whatever you add here.
Add a documentation page, press Refresh, and the commands on it become autofill
Add source takes the address of a documentation page, then Refresh
reads the OSC paths off it.
What it finds is cached, so the autofill still works with no internet.
The panel tells you how many commands you have to hand, and Clear scraped throws
the scraped ones away without touching the built-in list.
This is how the app keeps up with AbleSet without waiting for BuildAble to ship an update. AbleSet
documents a new command, you press Refresh, and it's in your autofill.
Licensing
Where you stand: activated or how many demo conversions are left, and the Gumroad key on this Mac.
Section 23
What gets built
Everything below is written into the session, from the download plus what you set.
What it reads
The folder name → title, key, BPM.
The Live 8 session → the tempo map, the meter map, the section locators, the stem
order.
The MultiTracks folder → the stems. A guide stem and a click stem are recognized
and treated specially.
What it writes
SONG TITLE, TEMPO and TIME SIG, labels plus the
master automation that actually drives the song.
CLICK, meter-aware, per tempo and meter segment, on your click output, playing
the sounds and pitches you chose.
SECTIONS +CC, a colored label per section, plus arrangement locators.
+GUIDE / +LOOPGUIDE, the three cue layers (Section 14).
Lyrics and Numbers text lanes, if you added them.
Your own control lanes, OSC and MIDI, as real clips with their CC envelopes drawn
in (Section 21).
The stems, one track each, grouped, [noshift] where tagged, sending
to the returns you set.
In Cues mode the guide layer is built differently: the template's +GUIDE
track stays and hosts the AbleSet Cues plugin, there's no drum-rack guide and no
+LOOPGUIDE, and your performance cues come out as a /cues/say lane.
Song length comes from the longest stem, snapped to the nearest bar, including
when the song slows down at the end. And every sample reference is healed to your installed pack, so
the session opens with no missing media on any machine.
Section 24
The output folder
A self-contained project folder, in a shape BuildAble decides rather than one you have
to maintain. Move it, back it up, hand it to someone, it works.
Build My Life - Passion | Gmaj | 70 BPM 4/4/└ Album.jpgcarried from the download└ _MultiTracks/the stems, copied in└ Build My Life - P Project/the Live 12 project
Why it's shaped this way, and why that's the point
None of this is a house style. BuildAble converts into one format on purpose, and it holds
you to parts of it, because every step after this one reads the format rather than guessing at your
song. Doing that work up front is what makes the rest of it easy.
What's forced
What it buys you later
The folder name carries title, artist, key, BPM, and meter
StitchAble reads a set straight off the folder names. Nothing to retype, and nothing to get wrong at 8am.
Fixed lane names, SECTIONS, +GUIDE, +LOOPGUIDE, +OSC
AbleSet finds them without being configured, and StitchAble knows which lanes to merge across a whole set instead of leaving one per song.
Stems copied in, referenced by relative path
The folder is portable. Drag it to another Mac or an external drive and it opens with no missing media.
One canonical guide rack layout
Cues stay on the pads they belong on, and Make consistent has something to compare against when a library drifts.
[noshift] on drums and loops
A key change in StitchAble moves the pitched instruments and leaves the grooves alone.
A .buildable.json card beside the song
The Library reads a big set instantly, and both apps work from one source of truth about that song.
Live 12 format, and older sessions blocked from editing
One old song can't quietly corrupt a mixed library.
The trade is deliberate. You give up naming the folder whatever you feel like, and
in exchange a song is legible to StitchAble, to AbleSet, to the Song Library, and to BuildAble itself
when you open it again in six months. A song built by hand is a song only you can read. A song built
here is one the tools can read too.
Inside the project folder is the .als, Ableton's project info, and your
AbleSet data if you set a template.
The stems are copied, never moved, and referenced by relative path. Your original
download is untouched, and the new folder doesn't depend on it, you can archive the download or
delete it.
That folder name is also exactly what StitchAble reads: title, artist, key, BPM,
meter. Convert here, and the song is already named the way the setlist builder wants it.
What lands in your output folder
Section 25
The Song Library
Everything up to here is about making a song. This is about the sixty you've already
made. Load a folder of finished sessions and manage the whole set from one window.
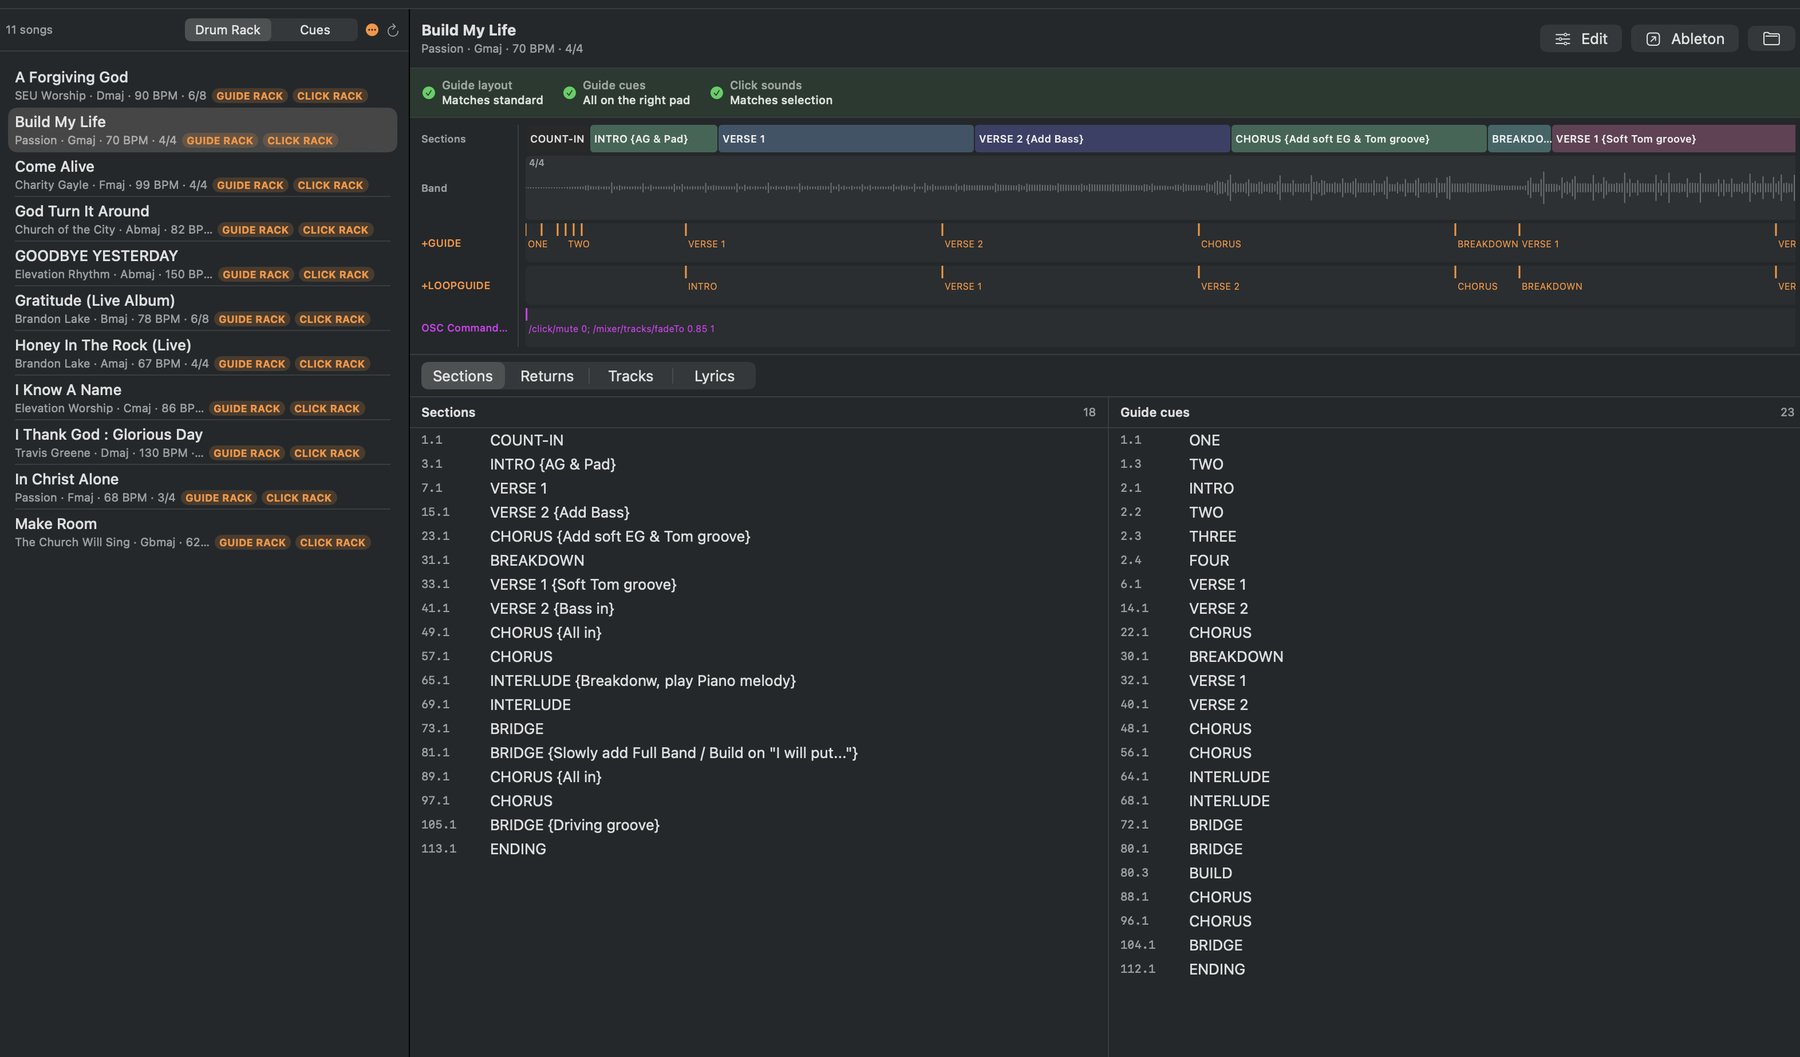
Browse and inspect
Direct it at a folder of built .als sessions and each song comes up as a card showing
its sections, its guide cues, which click pads are live, the guide and click families it was built with,
and the state of its lanes. You see what a song is without opening Ableton.
That's read from a cached .buildable.json sidecar sitting next to each song rather than
by parsing every session, so a big library opens in about the time it takes to look at it.
Opening a song from here is immediate. The window comes up on the click with a loading screen while
the session is read out of the way, then reveals ready to play, rather than sitting frozen on the click
while a multi-megabyte session is read. Waveform peaks are scanned once and kept, so the second time you
open a song there's nothing to scan at all.
Every finished song in one place, its arrangement pinned and its detail a click away
Cues here all show green. Everything in the Library is finalized, so there's nothing left to be
uncertain about the way there is while you're still building a song.
The arrangement map draws clip length, so a control-lane clip is a block you can
read the length of rather than a bare tick.
Lyric lanes sit directly above the song tracks, just under your custom control
lanes, the same place every time.
It opens straight away. The map's lanes are cached in the song card rather than read back out of
the .als each time you look.
The demo shows ten. Until the app is activated the Library lists only the first 10
songs it finds, with a banner offering to activate. It still loads the folder, you just see ten of
them; activate and the rest appear right away.
The detail view
Open a song's card and the arrangement stays pinned at the top while you page through the rest:
sections and cues, a returns patchbay, track names, and lyric lanes that collapse when you're not
looking at them. You're reading the built song, not a summary of it.
Open and edit
Open any song straight back into the editor, change what needs changing, and press Apply
changes. The edit goes into the .als itself: sections, guide and loop-guide cues,
your custom lanes, and lyric timing all write back.
You can also rename tracks and re-route returns on a song you already built, right
from the detail view, without converting it again. A stem that landed on the wrong return, or a track
that came in with a name you don't want to see on stage, is a fix in place rather than a rebuild. It
writes back through the same routing path the converter uses, so you end up with the session you would
have got if you'd set it that way to begin with.
It backs the session up first. Every apply writes an .als.bak beside
the song before it touches anything, so the version you had is still there.
Apply rebuilds your control lanes rather than adding another copy of them,
so applying twice leaves you with one set of lanes, not two.
Make consistent
Libraries drift. You change a family, reorder a rack, move a click sound, and songs built before that
are quietly built differently to songs built after. Make consistent finds it and fixes
it across the whole library at once.
What it finds
Why it matters
Guide drum-rack drift
The song's rack layout no longer matches your current one, so cues fire from the wrong place.
Clips firing the wrong pad
The clip is there and the sound is there, but they've come apart. You hear the wrong word.
Click-sound mismatches
One song's click doesn't sound like the rest of the set.
Missing media
A sample the session points at isn't where the session thinks it is.
Status is split into chips per song, guide layout on one and cues on the other, so a song with a
clean layout and one odd cue reads as exactly that. Mark as same teaches it that two cue
names mean the same thing, and it remembers that across every song in the library.
The Live 12 lock
A song saved by an older Ableton is flagged on its card and blocked from editing until you open it in
Live 12 and re-save it. The version is read from the .als and logged on the
card, so you can see which songs need it. It's a deliberate stop: writing Live 12 structures into an
older session is how a mixed library breaks quietly, and quietly is the worst way for it to break.
Section 26
Staying up to date
BuildAble 12 updates itself. You don't have to come back to the site to find out
something changed.
A version badge sits next to the title. Click it to check right now, or use
BuildAble 12 ▸ Check for Updates… in the menu.
It also checks on its own, a few seconds after launch and again every hour, and tells you when
there's something there. You don't have to remember to look.
Updates are signed, and they install once you approve them. Nothing installs
behind your back.
Coming from 1.0.x? This one is manual. The 1.0 builds shipped without the updater
in them, so there's nothing in that copy to check with. Download 1.1.0 from the site once and drag it
over, and every update after that arrives on its own.
Your license and your work are not touched by an update. The activation on this Mac
stays activated, and the songs you've converted stay exactly as they are.
Section 27
Troubleshooting
Most of what looks wrong is the app telling you something.
What you're seeing
What it means
A folder isn't detected
It needs MultiTrack.als sitting directly next to a MultiTracks folder. Still zipped? Rearranged? That's why. Or direct it one level up and let the scan find it.
A song won't rebuild
It's marked done and being skipped on purpose. Click its green check to re-arm it.
A cue is blank or unlabeled
Detection heard something it can't name. Label it in the Guide Cues editor and tap + to save it, it'll match on its own from then on.
A cue is the wrong voice
Check the Family in Settings. Cues resolve strictly inside the chosen family.
A cue won't match by name
Names match exactly now, apart from accents and case. If your section or clip name isn't spelled like the recording, rename it to match, or add a recording under that exact name, or use Mark as same in the Library to tie the two together.
"Whisper model unavailable"
It falls back to Apple Speech automatically. The model downloads on first use, check your connection, or just use Apple Speech.
"Can't edit this song" in the Library
It was saved by an older Ableton. Open it in Live 12, re-save it, and it unlocks.
A cue plays the wrong thing across a library
Run Make consistent. It repoints drifted racks and fixes clips firing the wrong pad. In Cues mode, use the match-or-add sheet to tie the phrase to a WAV.
A cue is silent in Cues mode
The family has no recording for that phrase, so it speaks in the generated voice. Add a WAV for it, or match it to one you already have.
Only 10 songs in the Library
The Library is limited to 10 songs until the app is activated. Activate from the banner and the rest appear.
An update won't install
Use Check for Updates… from the menu, or just download the current DMG from the site and drag it over.
Gatekeeper blocks the app
The DMG is notarized, so this shouldn't happen. If it does, right-click → Open, once.
The license won't activate
Email the support address on the activation screen. A person answers.
Nothing you do here can damage a download. BuildAble 12 only ever reads them.
If a convert goes wrong, fix the setting and convert again, there's nothing to undo.